I’ve been using OpenSSH certificates for some time now. They are very handy if you have a bunch of machines you want to trust, or a bunch of machines that shoud trust you. It’s very effective to trust just one host CA in order to trust all servers with certificates signed by this CA. Or the other way around, have your personal public key signed by a user CA and then be automatically trusted by all servers that trust this CA. But if you working together with alot of people let say within an organisation this becomes problematic pretty soon. Maybe your frontend people should only have access to webservers and database people to the database servers and so on. The solution to this is the little known flags AuthorizedPrincipalsFile and AuthorizedPrincipalsCommand in sshd_config.
OpenSSH Certificates and principals
Lets start with the certificates and the principals within these certificates. In order to make this work I would suggest to use principals within the certificates that are closely tied to the person using it, their company wide username for example. If different keys have different access leves (lets say because on of them are stored on a physical secure element/smart card) it is good to include this kind of information in the principal, according to some standard you make up. Let say I use yubikeys to store my private keys I could have principals like peter_file and peter_physcial. These are easily parsable and connected to a physical person.
Please note that there could be other access schemes where role is more important that how the key is stored, then role could be a better option for the principal suffix. But please note that if you burn the role into the certificate that person will need to have the current certificate revoked and have a new one issued if the role is ever changed. I will discuss a better way to handle this later.
Another option is to have multiple principals in the same certificate (ie peter,webmaster,root) but this also gets cumbersome when privileges and roles start to change over time.
AuthorizedPrincipalsFile
One solution to this problem is the configuration option AuthorizedPrincipalsFile in sshd_config. With this option you tell sshd where to look for a list of principals valid for a certain user. I looks something like
AuthorizedPrincipalsFile /etc/ssh/%u_principals
When someone tries to log in as peter sshd will check my certificate for validity and then look for valid principals in the file /etc/ssh/peter_principals. sshd expects this file to contain one valid principal per line and optionally preceded by extra options using the same format as the authorized_keys file. (ie from= and command=). This is flexible enough. I can now give multiple principals (or physical persons) access to a specific account by changing a file. I can also restrict access to certain hosts or create force commands for specific principals.
One use case for this could be a webserver where multiple principals(persons) should be able to use the “webmaster” account but at the same time the test/build system should only be allowed to run a certain commands to publish successful builds. Lets say that the account name is www, then the /etc/ssh/www_principals could look something like this:
peter erik from="buildserver.corp.com" command="/bin/publish_website"
buildserver from="guestcomputer.corp.com" guestworker
Please note: If you are really concerned with security, maybe you have given a certificate to a external partner or something, I would suggest to burn the from and command attributes into the certificate. In this way they will never be overridden by some configuration at the server side. The downside is that you will need to produce a new certificate if something changes.
If you have a pretty static setup and/or a decent configuration manager/orchestration tool this could be enough. It gives full flexibility on who should be able to access what, and how. But in the long run it could be tedious to manage all the principal files. This is where the AuthorizedPrincipalsCommand comes in to the picture.
AuthorizedPrincipalsCommand
This works exactly the same as AuthorizedPrincipalsFile but instead of a static file sshd will run a command followed by some options (basically the username that tries to log in) that will generate the principals file dynamically. This gives you a lot of options. Probably the most straight forward one is that you now can have a single ACL file for you whole environment and just let the command read it and produce a host and user specific principal file. One very simple example could look like this:
# Principal(person) user     host
erik                www      webserver.corp.com
peter               www      webserver.corp.com
guestworker         www      webserver.corp.com

peter               db       database.corp.com
erik                db       database.corp.com
Of course this file could be expanded to include more information and more options but this gives a example on how it can be done.
Other backends
But I think the real power in the AuthorizedPrincipalsCommand is that you now can use whatever backend you like and just have the principals command be a wrapper for this backend which could be some Active Directory, LDAP or whatever you might have at your organisation. This makes it possible to use existing infrastructure and still be able to use ssh certificates which I think is a real killer feature in OpenSSH.
If you have some ideas to improve this concept or an questions, please leave a comment.
This article describes how I installed FreeBSD on two different Allwinner based SoC’s.
Background
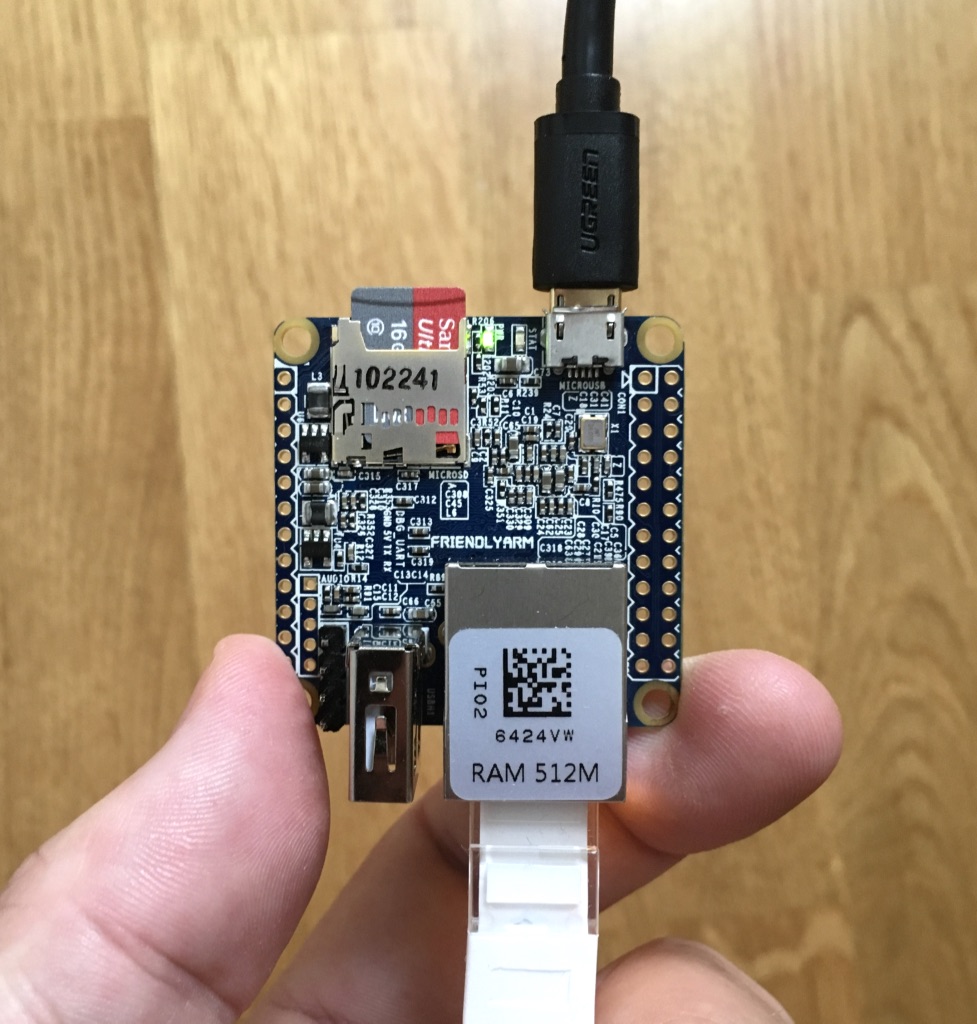
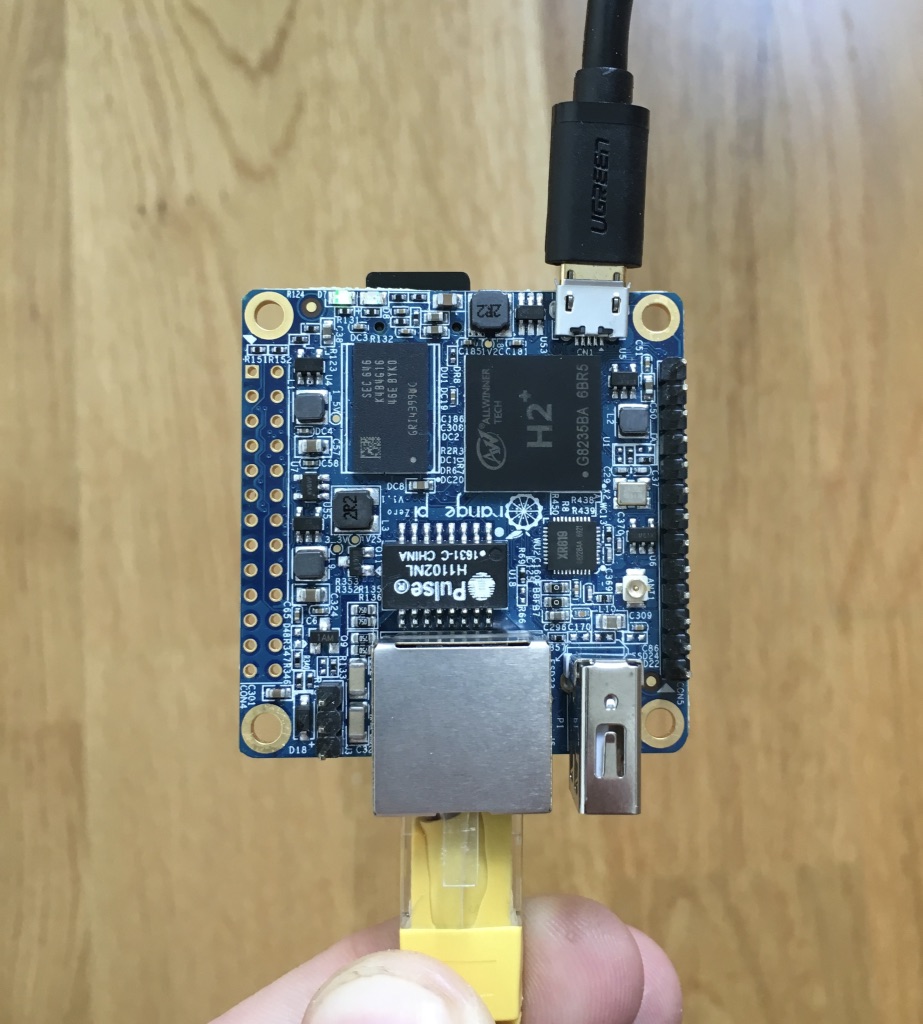
Recently I bought a NanoPi NEO and a OrangePi Zero from ebay just for fun, HOPING that FreeBSD would run nicely on them. But at first glance things arent that easy. There is no official images for example. But on the other hand there is a image building tool available at FreeBSD’s official github. This article will describe how I got FreeBSD running on these neat ARM computers. Happily this workflow works for both the Neo and the Zero.
Building the image
We need a u-boot image for the NanoPi. In the ports tree there is a lot of diffenret images but not for the nanopi, so what I did was simply to make a copy of the orange-pi-one port and edited it. I basically created my own local port for the NanoPI u-boot. This is what I did:
To define the NanoPI NEO board I was heavily inspired by the work of Jared McNeill. I basically copied his board definitions with a few changes to suit my setup. Here is the end result:
$ git diff origin/master
diff --git a/board/NanoPi-NEO/overlay/boot/loader.conf b/board/NanoPi-NEO/overlay/boot/loader.conf
new file mode 100644
index 0000000..9c0640f
--- /dev/null
+++ b/board/NanoPi-NEO/overlay/boot/loader.conf
@@ -0,0 +1,3 @@
+# Hack to get loader to find dtb.
+nanopi-neo.dtb_type="dtb"
+nanopi-neo.dtb_load="YES"
diff --git a/board/NanoPi-NEO/overlay/etc/fstab b/board/NanoPi-NEO/overlay/etc/fstab
new file mode 100644
index 0000000..65563ce
--- /dev/null
+++ b/board/NanoPi-NEO/overlay/etc/fstab
@@ -0,0 +1,4 @@
+/dev/mmcsd0s1  /boot/msdos     msdosfs rw,noatime      0 0
+/dev/mmcsd0s2a /               ufs rw,noatime          1 1
+md             /var/log        mfs rw,noatime,-s15m    0 0
+md             /var/tmp        mfs rw,noatime,-s12m    0 0
diff --git a/board/NanoPi-NEO/overlay/etc/rc.conf b/board/NanoPi-NEO/overlay/etc/rc.conf
new file mode 100644
index 0000000..b1ee7a6
--- /dev/null
+++ b/board/NanoPi-NEO/overlay/etc/rc.conf
@@ -0,0 +1,14 @@
+hostname="nanopi-neo"
+ifconfig_awg0="DHCP"
+sshd_enable="YES"
+
+# Nice if you have a network, else annoying.
+ntpd_enable="YES"
+ntpd_sync_on_start="YES"
+
+sendmail_submit_enable="NO"
+sendmail_outbound_enable="NO"
+sendmail_msp_queue_enable="NO"
+
+# CPU frequency scaling
+powerd_enable="YES"
diff --git a/board/NanoPi-NEO/setup.sh b/board/NanoPi-NEO/setup.sh
new file mode 100644
index 0000000..b93c728
--- /dev/null
+++ b/board/NanoPi-NEO/setup.sh
@@ -0,0 +1,34 @@
+KERNCONF=GENERIC
+UBLDR_LOADADDR=0x42000000
+SUNXI_UBOOT="u-boot-nanopi-neo"
+SUNXI_UBOOT_BIN="u-boot.img"
+IMAGE_SIZE=$((1000 * 1000 * 1000))
+TARGET_ARCH=armv6
+
+UBOOT_PATH="/usr/local/share/u-boot/${SUNXI_UBOOT}"
+
+allwinner_partition_image ( ) {
+    echo "Installing U-Boot files"
+    dd if=${UBOOT_PATH}/u-boot-sunxi-with-spl.bin conv=sync of=/dev/${DISK_MD} bs=1024 seek=8
+    dd if=${UBOOT_PATH}/u-boot.img conv=notrunc,sync of=/dev/${DISK_MD} \
+       bs=1024 seek=40
+    disk_partition_mbr
+    disk_fat_create 32m 16 1m
+    disk_ufs_create
+}
+strategy_add $PHASE_PARTITION_LWW allwinner_partition_image
+
+allwinner_check_uboot ( ) {
+    uboot_port_test ${SUNXI_UBOOT} ${SUNXI_UBOOT_BIN}
+}
+strategy_add $PHASE_CHECK allwinner_check_uboot
+
+strategy_add $PHASE_BUILD_OTHER freebsd_ubldr_build UBLDR_LOADADDR=${UBLDR_LOADADDR}
+strategy_add $PHASE_BOOT_INSTALL freebsd_ubldr_copy_ubldr .
+
+# Put the kernel on the FreeBSD UFS partition.
+strategy_add $PHASE_FREEBSD_BOARD_INSTALL board_default_installkernel .
+# overlay/etc/fstab mounts the FAT partition at /boot/msdos
+strategy_add $PHASE_FREEBSD_BOARD_INSTALL mkdir -p boot/msdos
+# ubldr help and config files go on the UFS partition (after boot dir exists)
+strategy_add $PHASE_FREEBSD_BOARD_INSTALL freebsd_ubldr_copy boot
diff --git a/nanopi_config.sh b/nanopi_config.sh
new file mode 100644
index 0000000..acedcf7
--- /dev/null
+++ b/nanopi_config.sh
@@ -0,0 +1,9 @@
+board_setup NanoPi-NEO
+option ImageSize 3900mb # for 4 Gigabyte card
+
+option Growfs
+option Email peter@framkant.org
+option CompressImage
+option User peter
+
+FREEBSD_SRC=/usr/src12
The few things I needed to change from Jared’s board definition was the few ugly lines in loader.conf and also I added conv=sync to the first dd in setup.sh because FreeBSD gave an error otherwise. If someone knows why I need the two lines in loader.conf please tell me.
Support for these boards are added piece by piece in the HEAD branch of FreeBSD. So I checked out a specific source tree with “HEAD” or basically FreeBSD 12-CURRENT.
$ svn co https://svn0.us-west.freebsd.org/base/head /usr/src12
[..]
After this I was ready to build the Image:
$ ./crochet.sh -c nanopi_config.sh
Starting at Sat Jul 1 11:40:10 CEST 2017
Loading configuration from nanopi_config.sh
Board: NanoPi-NEO
Option: ImageSize 3900mb
Option: Growfs
Option: Email peter@framkant.org
Option: CompressImage
Option: User peter
Source version is: 320481
Building FreeBSD version: 12.0
Image name is:
    /usr/local/crochet/work/FreeBSD-armv6-12.0-GENERIC-320481.img
Building FreeBSD version: 12.0
Object files are at: /usr/local/crochet/work/obj/arm.armv6/usr/src12
Found suitable FreeBSD source tree in:
    /usr/src12
Found U-Boot port in:
    /usr/local/share/u-boot/u-boot-nanopi-neo
Building FreeBSD armv6 world at Sat Jul 1 11:40:13 CEST 2017
    (Logging to /usr/local/crochet/work/_.buildworld.armv6.log)
Building FreeBSD armv6-GENERIC kernel at Sat Jul 1 13:04:58 CEST 2017
    (Logging to /usr/local/crochet/work/_.buildkernel.armv6-GENERIC.log)
Building FreeBSD armv6-GENERIC ubldr at Sat Jul 1 13:10:54 CEST 2017
    (Logging to /usr/local/crochet/work/ubldr-armv6-GENERIC/_.ubldr.armv6-GENERIC.build.log)
Creating a 3900MB raw disk image in:
    /usr/local/crochet/work/FreeBSD-armv6-12.0-GENERIC-320481.img
Installing U-Boot files
Installing U-Boot files
417+1 records in
418+0 records out
428032 bytes transferred in 3.867684 secs (110669 bytes/sec)
385+1 records in
386+0 records out
395264 bytes transferred in 3.055042 secs (129381 bytes/sec)
Partitioning the raw disk image with MBR at Sat Jul 1 13:43:51 CEST 2017
gpart create -s MBR md13
md13 created
Creating a 32m FAT partition at Sat Jul 1 13:43:51 CEST 2017 with start block 1m and label BOOT
active set on md13s1
Creating an auto-sized UFS partition at Sat Jul 1 13:43:52 CEST 2017
md13s2 created
/dev/md13s2a: 3685.4MB (7547776 sectors) block size 32768, fragment size 4096
        using 6 cylinder groups of 626.09MB, 20035 blks, 80256 inodes.
super-block backups (for fsck_ffs -b #) at:
 192, 1282432, 2564672, 3846912, 5129152, 6411392
tunefs: soft updates set
Using inode 4 in cg 0 for 4194304 byte journal
tunefs: soft updates journaling set
tunefs: NFSv4 ACLs set
Mounting all file systems:
Mounting FAT partition 1 at /usr/local/crochet/work/_.mount.boot
Mounting UFS partition 1 at /usr/local/crochet/work/_.mount.freebsd
Installing ubldr in /usr/local/crochet/work/_.mount.boot
Installing FreeBSD world at Sat Jul 1 13:43:55 CEST 2017
    Destination: /usr/local/crochet/work/_.mount.freebsd
Overlaying board-specific files from /usr/local/crochet/board/NanoPi-NEO/overlay
1 block
Installing FreeBSD kernel at Sat Jul 1 13:51:34 CEST 2017
    Destination: /usr/local/crochet/work/_.mount.freebsd
Installing all ubldr files in boot
1394 blocks
Adding user peter with password peter
Unmounting /usr/local/crochet/work/_.mount.boot
Unmounting /usr/local/crochet/work/_.mount.freebsd
Releasing md13
Compressing image
DONE.
Completed disk image is in: /usr/local/crochet/work/FreeBSD-armv6-12.0-GENERIC-320481.img

Copy to a suitable memory card using a command such as:
dd if=/usr/local/crochet/work/FreeBSD-armv6-12.0-GENERIC-320481.img of=/dev/da0 bs=1m
(Replace /dev/da0 with the appropriate path for your card reader.)

Finished at Sat Jul 1 13:59:39 CEST 2017
Writing to SD card
After this there was a simple task of writing the image file to a SD card left:
$ ssh torus 'cat /usr/local/crochet/work/FreeBSD-armv6-12.0-GENERIC-320481.img.xz' | unxz | sudo dd of=/dev/rdisk2 bs=1m
0+408362 records in
0+408362 records out
3899999744 bytes transferred in 36.899393 secs (105692788 bytes/sec)
Booting the NanoPI
After writing the image to SD I just inserted the card, network and power to my NanoPI and after a while I got this in the logs of my router:
Jul  1 19:05:02 gw dhcpd: DHCPDISCOVER from 02:81:14:26:0a:0e via bridge0
Jul  1 19:05:03 gw dhcpd: DHCPOFFER on 172.25.0.182 to 02:81:14:26:0a:0e (nanopi-neo) via bridge0
Jul  1 19:05:05 gw dhcpd: Wrote 0 deleted host decls to leases file.
Jul  1 19:05:05 gw dhcpd: Wrote 0 new dynamic host decls to leases file.
Jul  1 19:05:05 gw dhcpd: Wrote 36 leases to leases file.
Jul  1 19:05:05 gw dhcpd: DHCPREQUEST for 172.25.0.182 (172.25.0.1) from 02:81:14:26:0a:0e (nanopi-neo) via bridge0
Jul  1 19:05:05 gw dhcpd: DHCPACK on 172.25.0.182 to 02:81:14:26:0a:0e (nanopi-neo) via bridge0
Now it was a simple task to log in to the device using peter/peter:
$ ssh 172.25.0.182
Password for peter@nanopi:
Last login: Sat Jul  1 17:16:05 2017 from lune.pean.org
FreeBSD 12.0-CURRENT (GENERIC) #0 r320481: Sat Jul  1 13:10:46 CEST 2017

Welcome to FreeBSD!
[..]
Boot messages
$ dmesg
KDB: debugger backends: ddb
KDB: current backend: ddb
Copyright (c) 1992-2017 The FreeBSD Project.
Copyright (c) 1979, 1980, 1983, 1986, 1988, 1989, 1991, 1992, 1993, 1994
	The Regents of the University of California. All rights reserved.
FreeBSD is a registered trademark of The FreeBSD Foundation.
FreeBSD 12.0-CURRENT #0 r320481: Sat Jul  1 13:10:46 CEST 2017
    peter@torus.pean.org:/usr/local/crochet/work/obj/arm.armv6/usr/src12/sys/GENERIC arm
FreeBSD clang version 4.0.0 (tags/RELEASE_400/final 297347) (based on LLVM 4.0.0)
WARNING: WITNESS option enabled, expect reduced performance.
VT: init without driver.
CPU: ARM Cortex-A7 r0p5 (ECO: 0x00000000)
CPU Features:
  Multiprocessing, Thumb2, Security, Virtualization, Generic Timer, VMSAv7,
  PXN, LPAE, Coherent Walk
Optional instructions:
  SDIV/UDIV, UMULL, SMULL, SIMD(ext)
LoUU:2 LoC:3 LoUIS:2
Cache level 1:
 32KB/64B 4-way data cache WB Read-Alloc Write-Alloc
 32KB/32B 2-way instruction cache Read-Alloc
Cache level 2:
 512KB/64B 8-way unified cache WB Read-Alloc Write-Alloc
real memory  = 536870912 (512 MB)
avail memory = 507977728 (484 MB)
FreeBSD/SMP: Multiprocessor System Detected: 4 CPUs
arc4random: no preloaded entropy cache
random: entropy device external interface
kbd0 at kbdmux0
ofwbus0:
aw_ccu0:  on ofwbus0
clk_fixed0:  on aw_ccu0
clk_fixed1:  on aw_ccu0
clk_fixed2:  on aw_ccu0
aw_gate0:  mem 0x1f01428-0x1f0142b on aw_ccu0
aw_modclk0:  mem 0x1f01454-0x1f01457 on aw_ccu0
simplebus0:  on ofwbus0
aw_ccung0:  mem 0x1c20000-0x1c203ff on simplebus0
aw_reset0:  mem 0x1f014b0-0x1f014b3 on simplebus0
iichb0:  mem 0x1f02400-0x1f027ff irq 36 on simplebus0
iichb0: could not find clock
device_attach: iichb0 attach returned 2
regfix0:  on ofwbus0
regfix1:  on ofwbus0
regfix2:  on ofwbus0
iichb0:  mem 0x1f02400-0x1f027ff irq 36 on simplebus0
iichb0: could not find clock
device_attach: iichb0 attach returned 2
iichb0:  mem 0x1f02400-0x1f027ff irq 36 on simplebus0
iichb0: could not find clock
device_attach: iichb0 attach returned 2
aw_sid0:  mem 0x1c14000-0x1c143ff on simplebus0
iichb0:  mem 0x1f02400-0x1f027ff irq 36 on simplebus0
iichb0: could not find clock
device_attach: iichb0 attach returned 2
awusbphy0:  mem 0x1c19400-0x1c1942b,0x1c1a800-0x1c1a803,0x1c1b800-0x1c1b803,0x1c1c800-0x1c1c803,0x1c1d800-0x1c1d803 on simplebus0
iichb0:  mem 0x1f02400-0x1f027ff irq 36 on simplebus0
iichb0: could not find clock
device_attach: iichb0 attach returned 2
iichb0:  mem 0x1f02400-0x1f027ff irq 36 on simplebus0
iichb0: could not find clock
device_attach: iichb0 attach returned 2
gic0:  mem 0x1c81000-0x1c81fff,0x1c82000-0x1c83fff,0x1c84000-0x1c85fff,0x1c86000-0x1c87fff irq 30 on simplebus0
gic0: pn 0x1, arch 0x2, rev 0x1, implementer 0x43b irqs 160
iichb0:  mem 0x1f02400-0x1f027ff irq 36 on simplebus0
iichb0: could not find clock
device_attach: iichb0 attach returned 2
iichb0:  mem 0x1f02400-0x1f027ff irq 36 on simplebus0
iichb0: could not find clock
device_attach: iichb0 attach returned 2
gpio0:  mem 0x1c20800-0x1c20bff irq 14,15 on simplebus0
gpiobus0:  on gpio0
gpio1:  mem 0x1f02c00-0x1f02fff irq 34 on simplebus0
gpiobus1:  on gpio1
iichb0:  mem 0x1f02400-0x1f027ff irq 36 on simplebus0
iichb0: could not find clock
device_attach: iichb0 attach returned 2
iichb0:  mem 0x1f02400-0x1f027ff irq 36 on simplebus0
iichb0: could not find clock
device_attach: iichb0 attach returned 2
gpioregulator0:  on ofwbus0
iichb0:  mem 0x1f02400-0x1f027ff irq 36 on simplebus0
iichb0: could not find clock
device_attach: iichb0 attach returned 2
iichb0:  mem 0x1f02400-0x1f027ff irq 36 on simplebus0
iichb0: could not find clock
device_attach: iichb0 attach returned 2
generic_timer0:  irq 0,1,2,3 on ofwbus0
Timecounter "ARM MPCore Timecounter" frequency 24000000 Hz quality 1000
Event timer "ARM MPCore Eventtimer" frequency 24000000 Hz quality 1000
rtc0:  mem 0x1f00000-0x1f00053 irq 31,32 on simplebus0
iichb0:  mem 0x1f02400-0x1f027ff irq 36 on simplebus0
iichb0: could not find clock
device_attach: iichb0 attach returned 2
iichb0:  mem 0x1f02400-0x1f027ff irq 36 on simplebus0
iichb0: could not find clock
device_attach: iichb0 attach returned 2
iichb0:  mem 0x1f02400-0x1f027ff irq 36 on simplebus0
iichb0: could not find clock
device_attach: iichb0 attach returned 2
iichb0:  mem 0x1f02400-0x1f027ff irq 36 on simplebus0
iichb0: could not find clock
device_attach: iichb0 attach returned 2
iichb0:  mem 0x1f02400-0x1f027ff irq 36 on simplebus0
iichb0: could not find clock
device_attach: iichb0 attach returned 2
iichb0:  mem 0x1f02400-0x1f027ff irq 36 on simplebus0
iichb0: could not find clock
device_attach: iichb0 attach returned 2
cpulist0:  on ofwbus0
cpu0:  on cpulist0
cpufreq_dt0:  on cpu0
cpu1:  on cpulist0
cpu2:  on cpulist0
cpu3:  on cpulist0
a31dmac0:  mem 0x1c02000-0x1c02fff irq 4 on simplebus0
a10_mmc0:  mem 0x1c0f000-0x1c0ffff irq 5 on simplebus0
mmc0: <MMC/SD bus> on a10_mmc0
ehci0:  mem 0x1c1d000-0x1c1d0ff irq 12 on simplebus0
usbus0: EHCI version 1.0
usbus0 on ehci0
ohci0:  mem 0x1c1d400-0x1c1d4ff irq 13 on simplebus0
usbus1 on ohci0
gpioc0:  on gpio0
aw_wdog0:  mem 0x1c20ca0-0x1c20cbf irq 20 on simplebus0
uart0:  mem 0x1c28000-0x1c283ff irq 23 on simplebus0
uart0: console (115384,n,8,1)
gpioc1:  on gpio1
awg0:  mem 0x1c30000-0x1c30103,0x1c00030-0x1c00033 irq 35 on simplebus0
miibus0:  on awg0
ukphy0:  PHY 0 on miibus0
ukphy0:  none, 10baseT, 10baseT-FDX, 100baseTX, 100baseTX-FDX, auto, auto-flow
ukphy1:  PHY 1 on miibus0
ukphy1:  none, 10baseT, 10baseT-FDX, 100baseTX, 100baseTX-FDX, auto, auto-flow
awg0: Ethernet address: 02:81:14:26:0a:0e
iichb0:  mem 0x1f02400-0x1f027ff irq 36 on simplebus0
iichb0: could not find clock
device_attach: iichb0 attach returned 2
aw_thermal0:  mem 0x1c25000-0x1c253ff irq 37 on simplebus0
gpioled0:  on ofwbus0
cryptosoft0:
Timecounters tick every 1.000 msec
usbus0: 480Mbps High Speed USB v2.0
usbus1: 12Mbps Full Speed USB v1.0
ugen0.1:  at usbus0
uhub0:  on usbus0
ugen1.1:  at usbus1
uhub1:  on usbus1
mmcsd0: 16GB  at mmc0 50.0MHz/4bit/65535-block
Release APs
WARNING: WITNESS option enabled, expect reduced performance.
arc4random: no preloaded entropy cache
Trying to mount root from ufs:/dev/mmcsd0s2a [rw,noatime]...
arc4random: no preloaded entropy cache
uhub1: 1 port with 1 removable, self powered
arc4random: no preloaded entropy cache
uhub0: 1 port with 1 removable, self powered
GEOM_PART: mmcsd0s2 was automatically resized.
  Use `gpart commit mmcsd0s2` to save changes or `gpart undo mmcsd0s2` to revert them.
lock order reversal:
 1st 0xcd331e88 bufwait (bufwait) @ /usr/src12/sys/kern/vfs_bio.c:3539
 2nd 0xc3470000 dirhash (dirhash) @ /usr/src12/sys/ufs/ufs/ufs_dirhash.c:281
stack backtrace:
lock order reversal:
 1st 0xc345d5d4 ufs (ufs) @ /usr/src12/sys/kern/vfs_subr.c:2602
 2nd 0xcd331e88 bufwait (bufwait) @ /usr/src12/sys/ufs/ffs/ffs_vnops.c:280
 3rd 0xc345c934 ufs (ufs) @ /usr/src12/sys/kern/vfs_subr.c:2602
stack backtrace:
random: unblocking device.
awg0: link state changed to DOWN
awg0: link state changed to UP
For now I have only tested that the machine boots with network and the serial console. During my research I found alot of post about problems with USB for example.
Background
Sometimes I do stupid stuff like editing my firewall rules at home from a remote location and get myself locked out. Sometimes my internet connection is just broken for one reason or the other, this is when you need a out of band channel to your network. You can buy pretty expensive integrated hardware for this with 3G connection and serial consoles and so on, but since this is a project for my home network i decided to build something using a raspberry pi.
Prerequisites
To get this project going I wanted to have a raspberry pi, some sort of wireless connectivity and a serial console to my router.
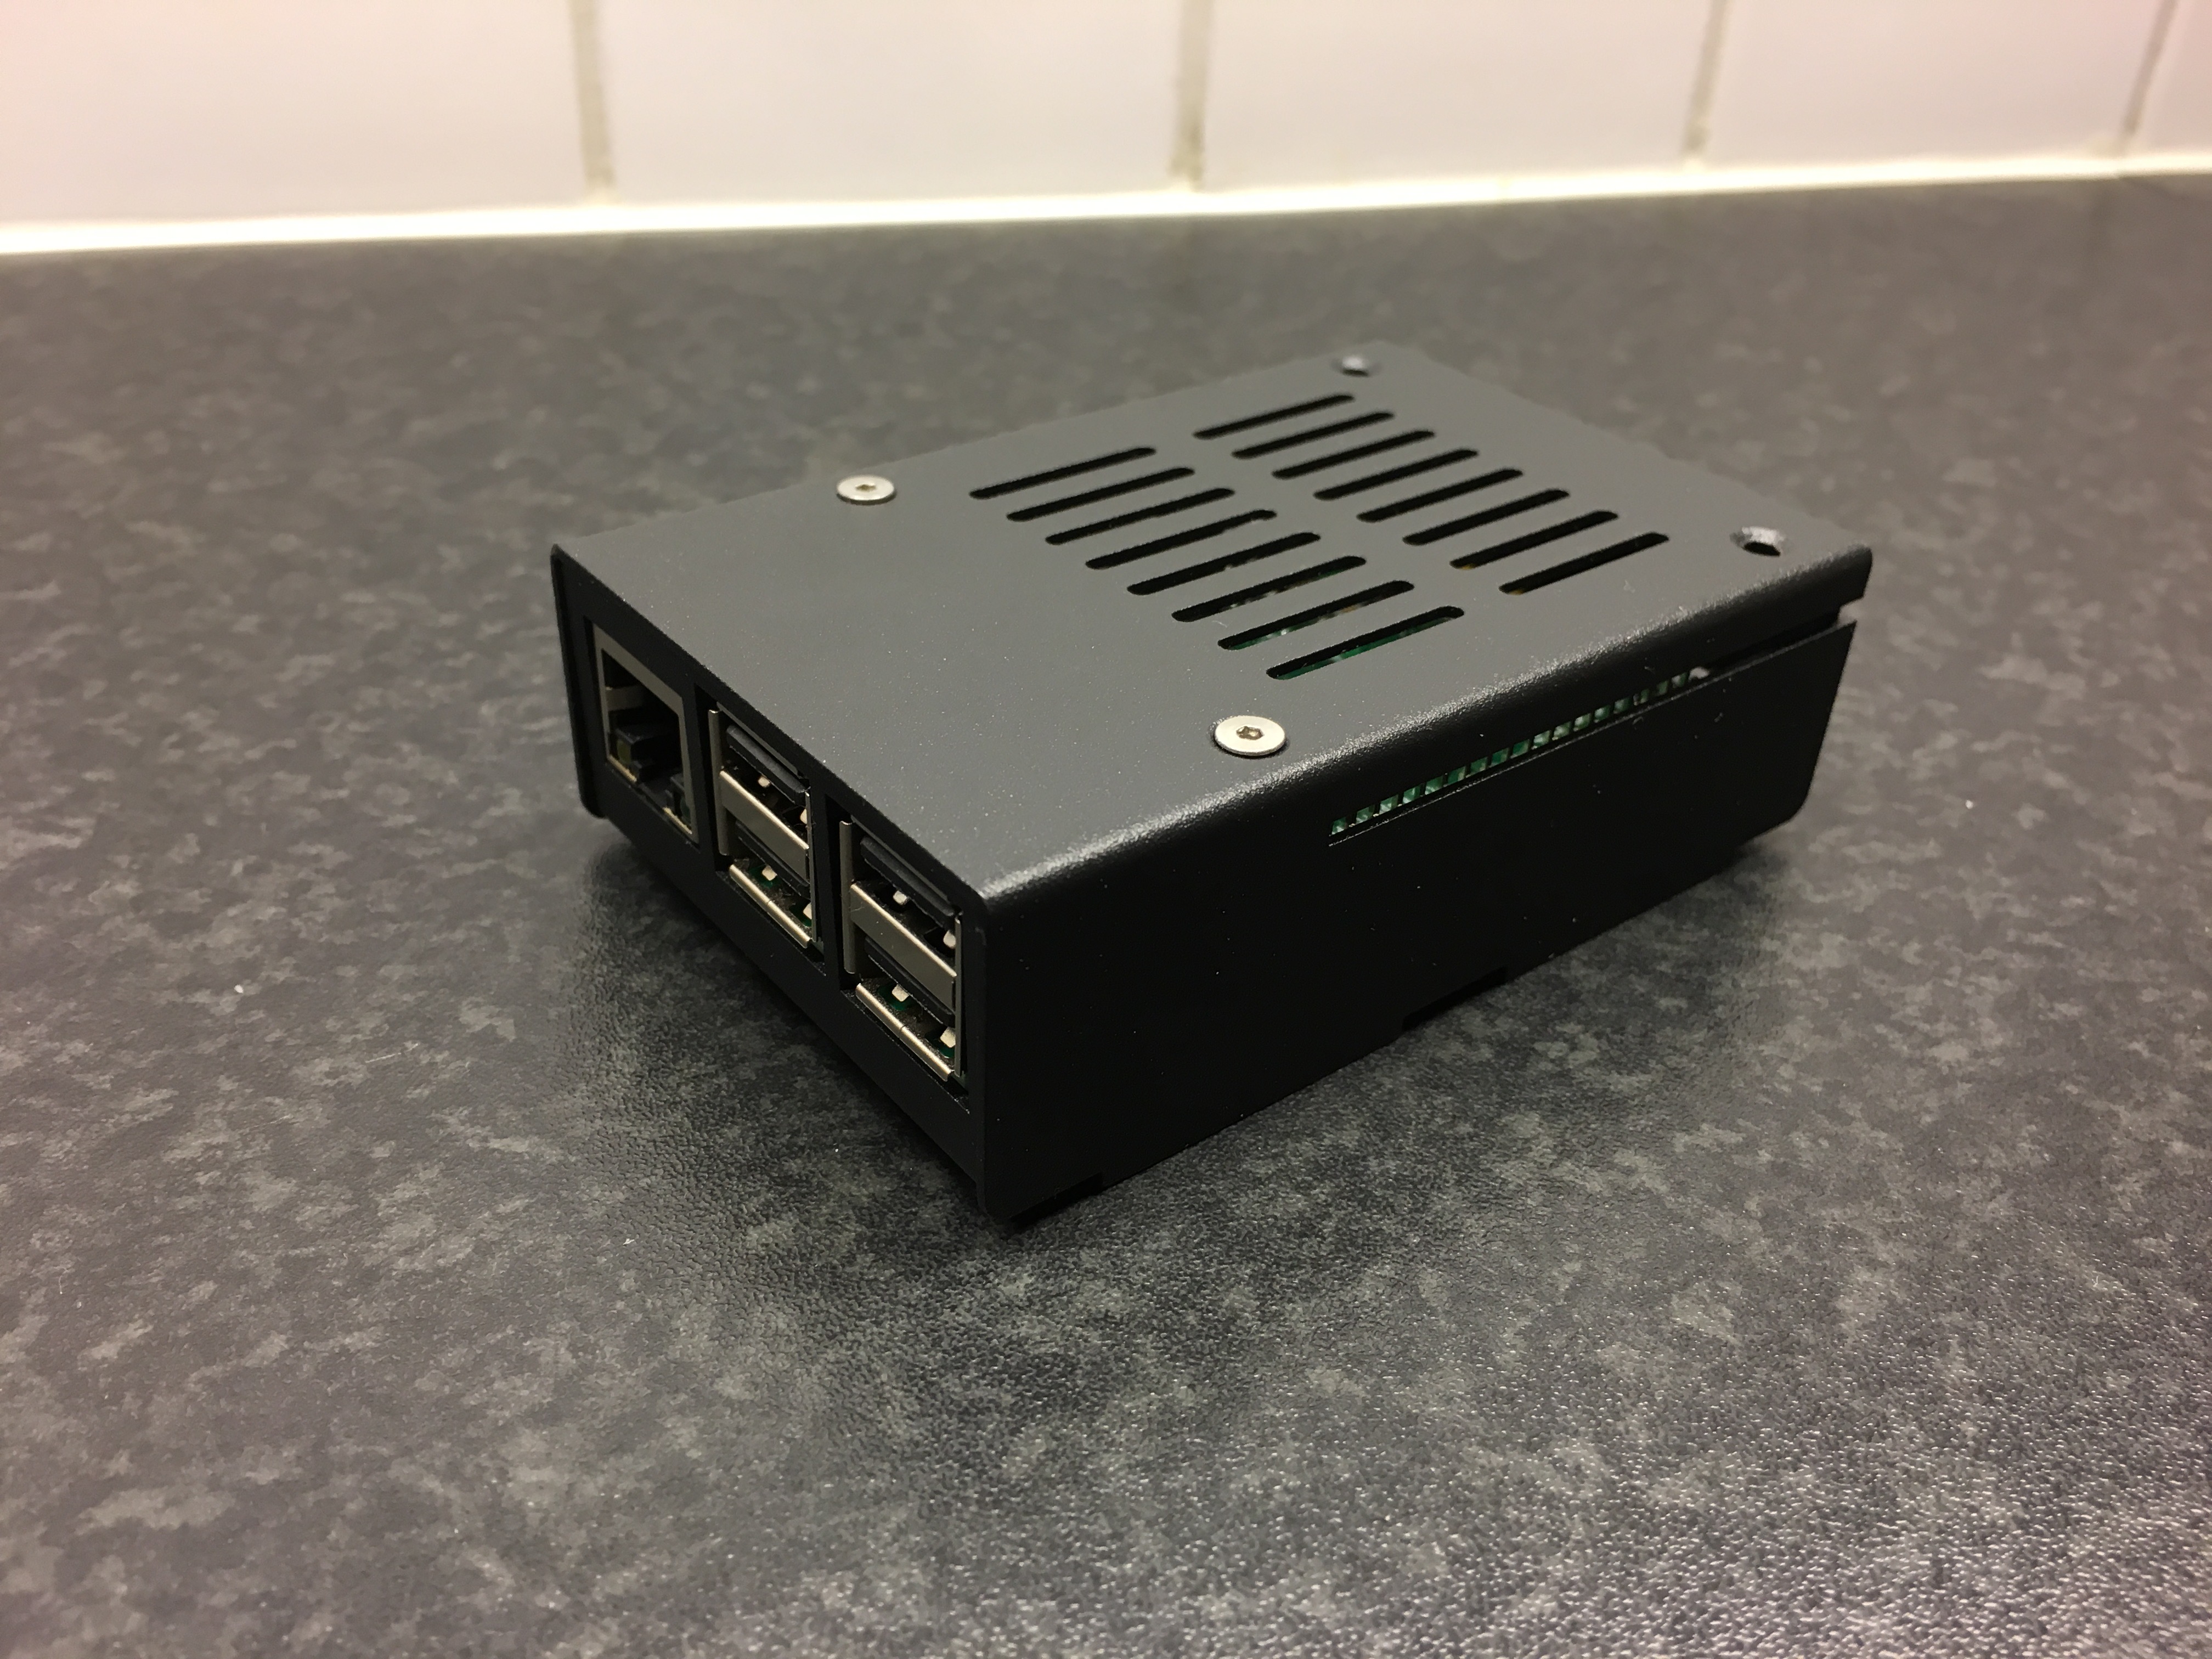
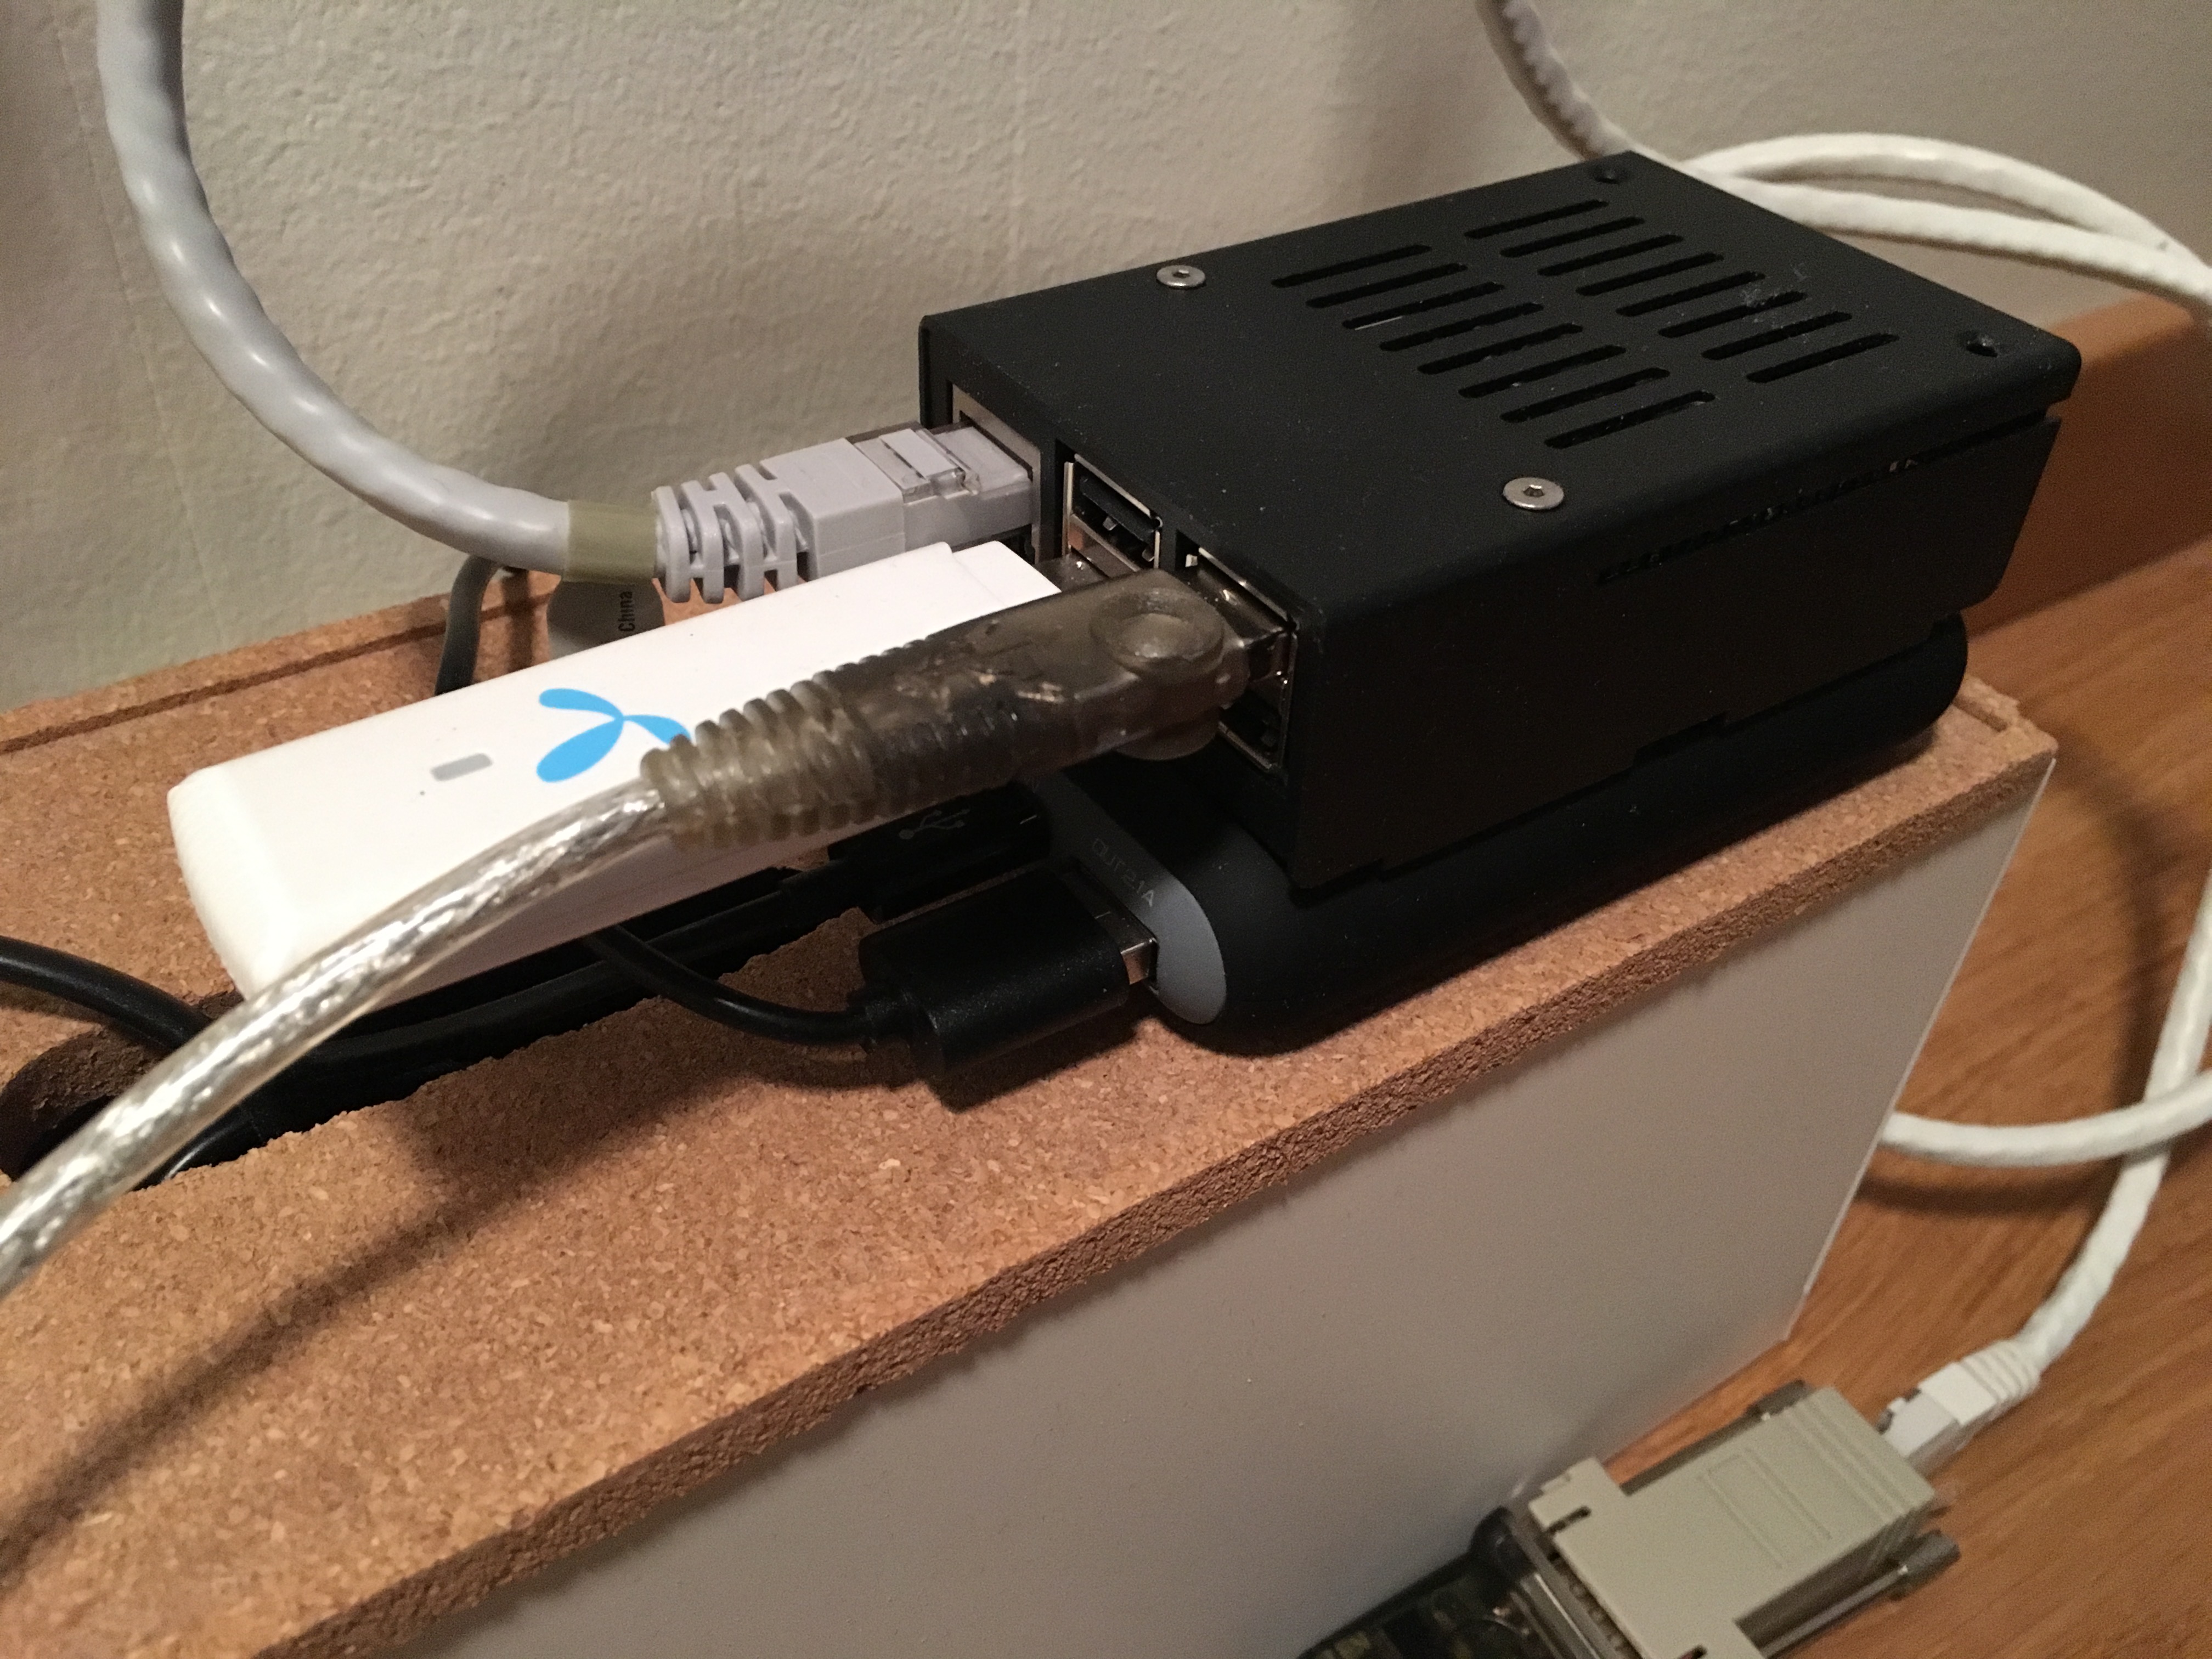
So I got a Raspberry Pi 2B, this pretty neat case, a old Huawei E1752 from ebay and finally a Linocell Powerbank as a battery backup. For the actual mobile data I got a pre paid SIM card from Telia and got a few GB of data.
Raspberry Pi in case
Physical setup and operating system
This setup is very basic and I just put the Pi inside the case and installed FreeBSD using the official image from freebsd.org. I draw power from the powerbank to the pi, and the powerbank is permanently hooked up to power, this way it will run for maybe an hour or so in the event of a power failure.
3G configuration
The reason i got the pretty old E1752 was because it was dirt cheap and also I was absolutley positive it was supported by the u3g driver in FreeBSD.
It is very easy to set up actually, you just put in into a USB port of your Pi and it shows up as three serial interfaces (and maybe some storage device). The first thing you should do is to put the modem in “modem only” mode by sending some AT-codes
# cu -l /dev/cuaU1.0
AT^U2DIAG=0
OK
Then its time to get nostalgic! edit the /etc/ppp/ppp.conf. This was the first time for me since 1998 or something. Of course you will need to figure out some stuff about your 3G provider and make changes accordingly
default:
 set log Phase Chat LCP IPCP CCP tun command
 set device /dev/cuaU1.0
 set timeout 180

telia:
 set speed 115200
 set timeout 0
# set authname wapuser1
# set authkey wap
 set dial "ABORT BUSY TIMEOUT 3 \
        \"\" \
        AT OK-AT-OK \
        AT+CFUN=1 OK-AT-OK \
        AT+CMEE=2 OK-AT-OK \
        AT+CSQ OK \
        AT+CGDCONT=1,\\\"IP\\\",\\\"online.telia.se\\\" OK \
        ATD*99# CONNECT"
 enable dns
 resolv writable
 set ifaddr 10.0.0.1/0 10.0.0.2/0 255.255.255.255 0.0.0.0
 delete! default
 add! default HISADDR
then just test the connection by running “service ppp onestart”
Serial console
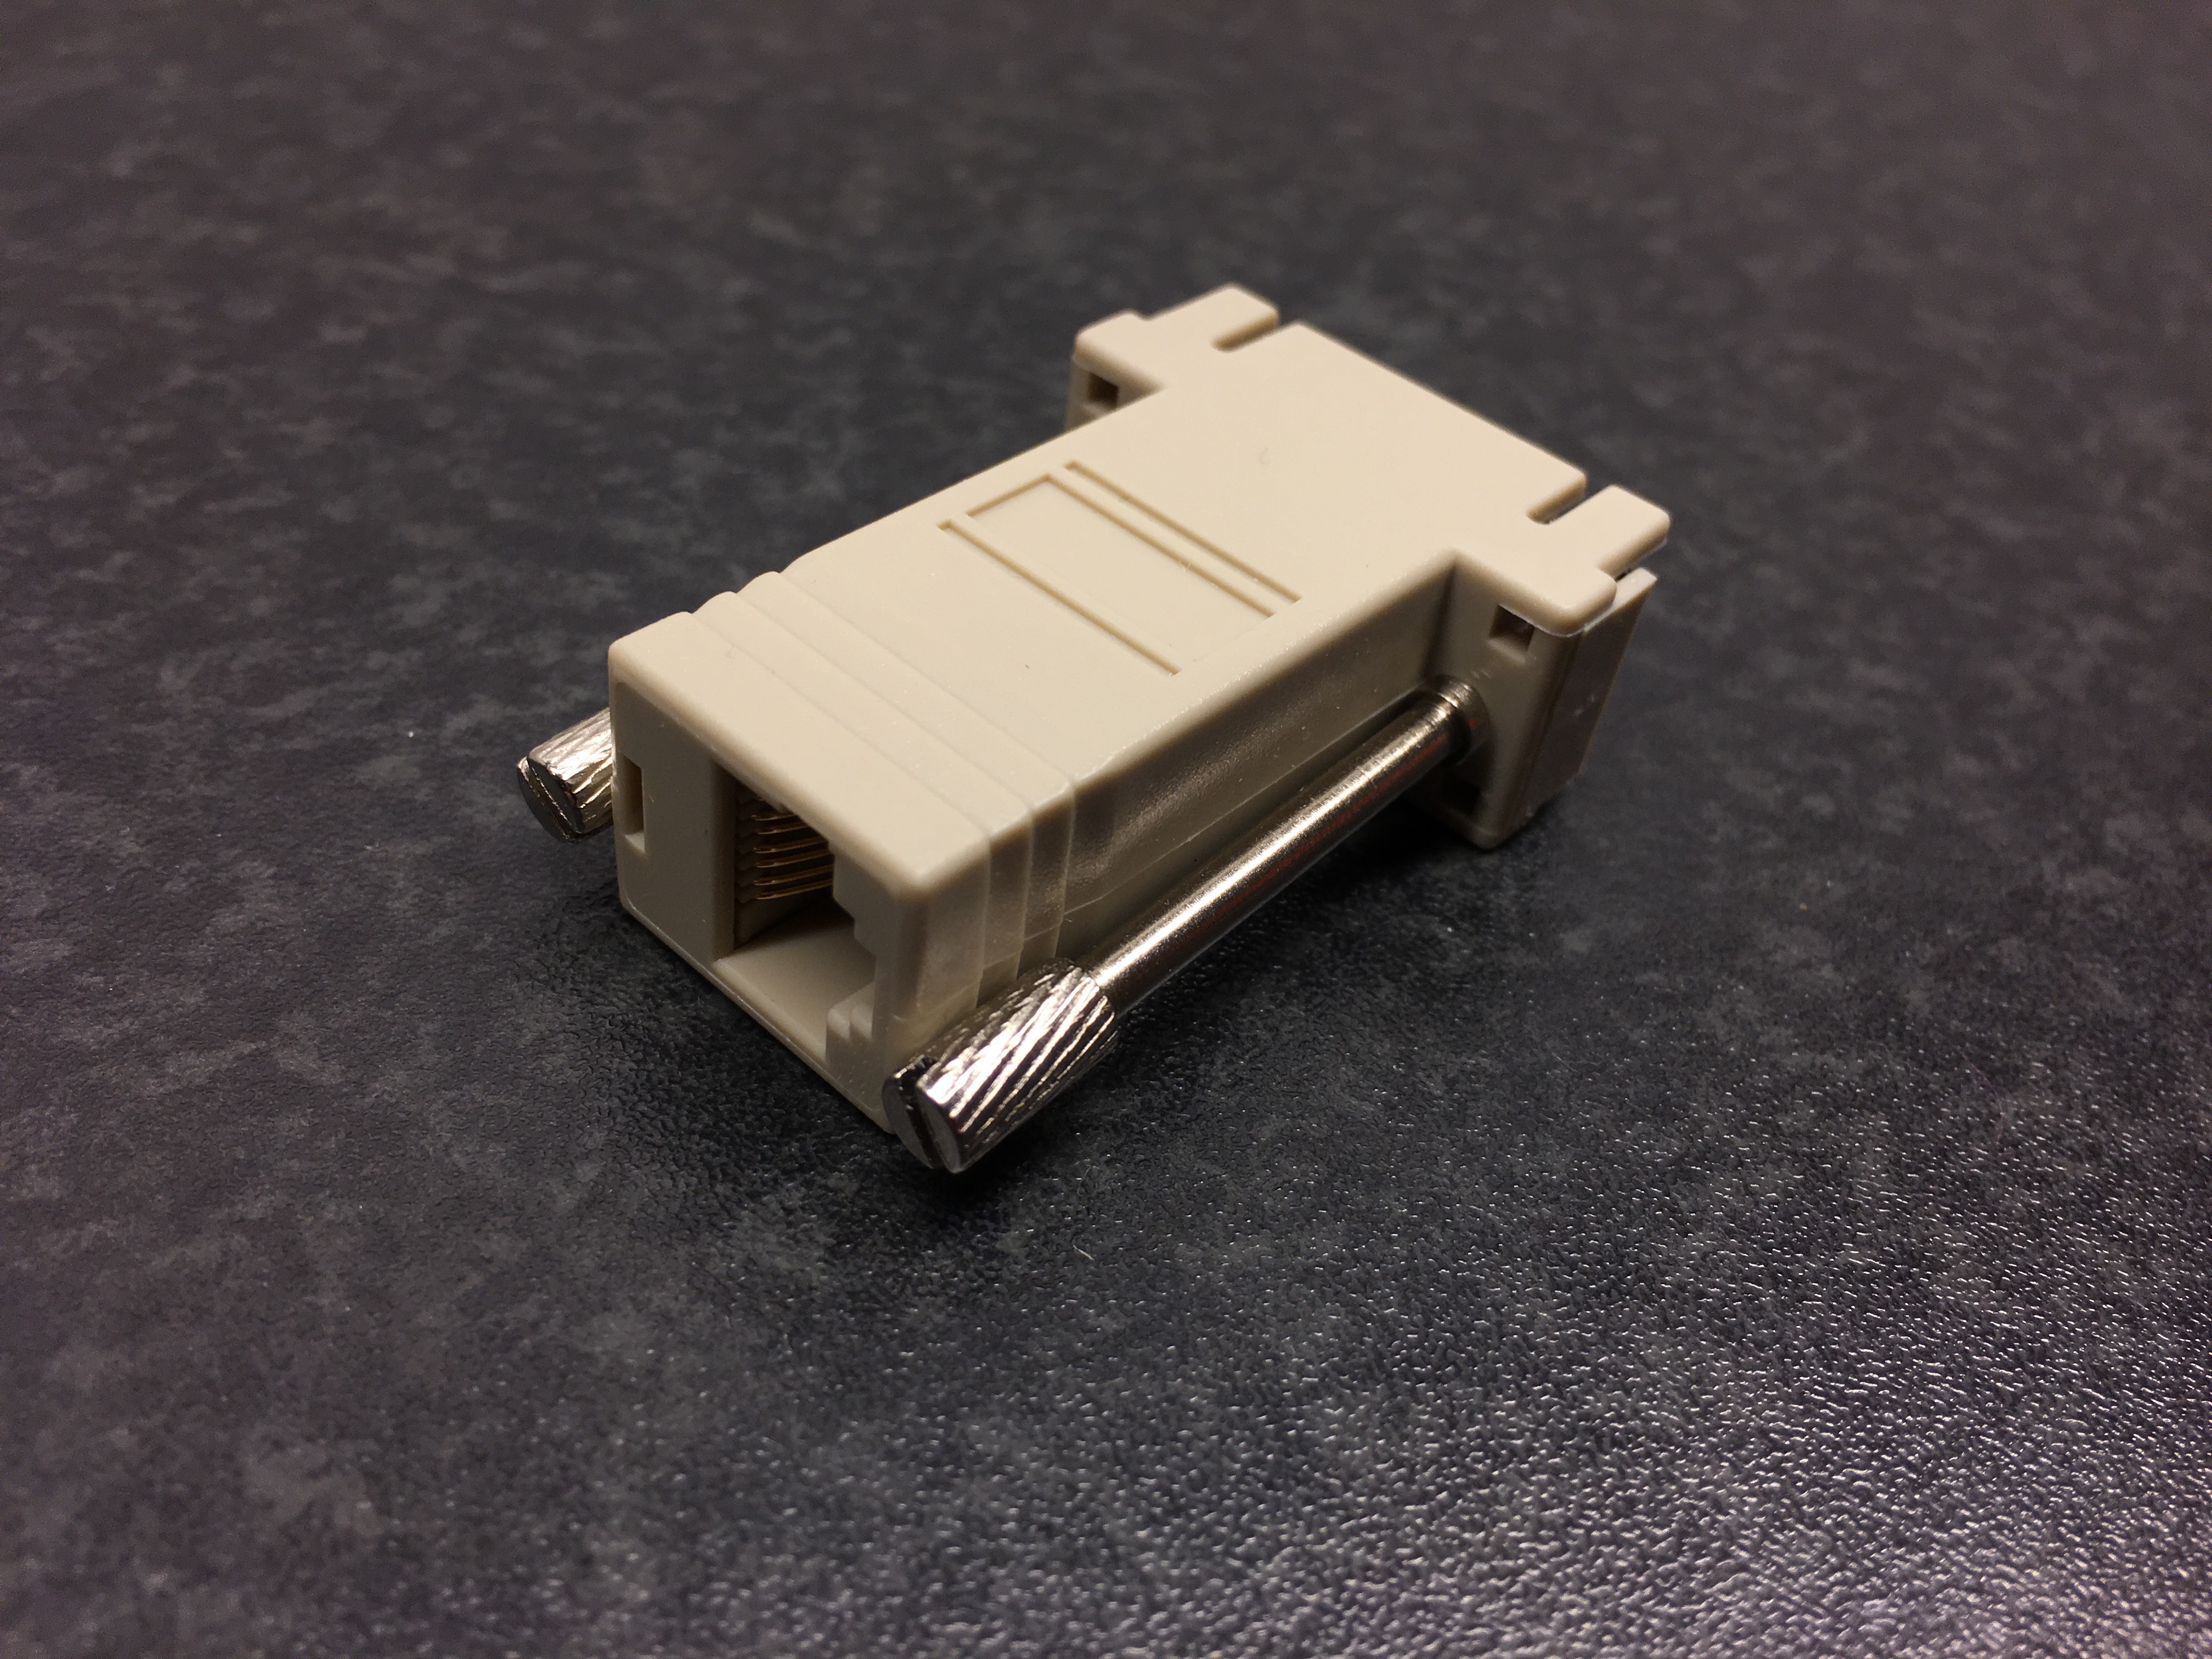
My router is located in a small patch cupboard and there was little room for another machine there, so I had to put my OOBM-server somewhere else in my apartment. Luckily I have RJ45 jacks everywhere that are patched to that cupboard so I could very easily run the serial console over the existing CAT6 cables. On the router side I just use a reglar serial cable with DB9 female on one side and a RJ45 male on the other side. On the OOBM-server side I have a simple USB-serial converter followed by a DB9 female to RJ45 female converter. The USB-serial converter shows up in FreeBSD as a regular serial interface like /dev/cuaU0.
RJ45 to DB9
Out Of Band functionality
Lets put everything together. The first thing i needed to figure out was how to enable the 3g connection remote, but this was pretty simple because the modem can receive sms messages. So I just send some magic/secret sms to the modem that tells it to connect.
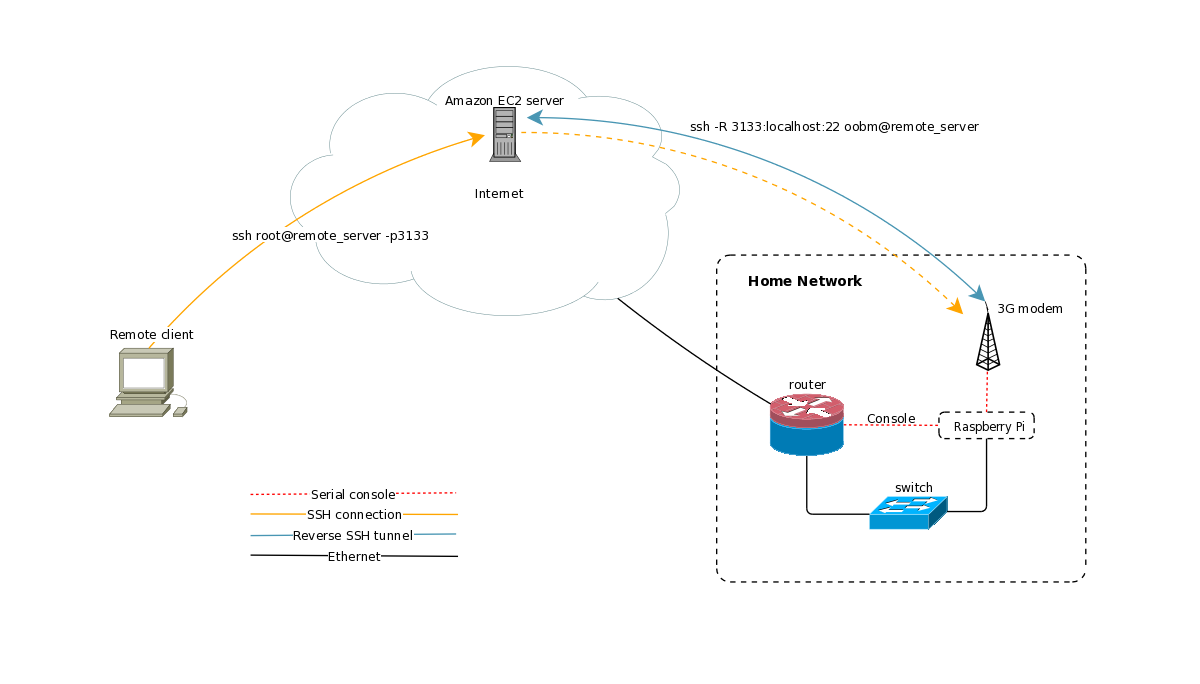
Next problem I encountered was that Telia blocks all (?) incoming ports on the mobile connection and since I want to do ssh based administration this was a problem. To work around this problem I went for a solution where the OOBM-server first sets up the PPP connection and then sets up a ssh connection with remote port forwarding to one of my amazon instances. Then I just ssh to the amazon instance on some port and end up on “localhost” on the OOBM-server. On the amazon instance I have created a specific account only used for this purpose that accepts the ssh key used by the OOBM-server.
To put everything together I wrote a small python script that runs every few minutes and checks for valid sms messages on the modem and if it finds such message fires up the PPP connection and then the ssh connection. I will spare you the hazzle of reading my ugly code but here is some pseudo code describing what it does:
m = connect(modem)
if m.send_at("AT") != "OK":
   print "modem is not responsive"
   exit(1)

#Look for valid activation sms
for msg in m.messages():
    if msg.number == "NYNUMBER" && msg.text == "SECRET"
        activate = True
        break

#Try a maximum of three times to set up the connection.
if activate:
    for tries in range(3):
        start_ppp()

        #Check that we can reach internet
        test_connectivity()

        #check that we actually  reach internet via 3G
        verify_route()

        # set up the reverse ssh (ssh -R 31337:localhost:22 remote_server)
        start_ssh()

        #Notify me via pushover that connection is up
        send_push("OOBM link up")

        sleep(1800)

        m.delete_message(all)
        stop_ssh()
        stop_ppp()

        #Notify me via sms that OOBM link is down
        m.send_sms(NUMBER,"OOBM link is down")
        exit(0)
I have omitted the error handling in the pseudo code but I ensure you that the actual script have some.. 😉
The reason i use push messages when the link is up and sms when the link is down is because this modem doesnt have multiplexing and it cant send sms messages while connected.
When the connection is up and running its a simple task to just ssh to remote_server at port 31337 and then login to the OOBM server. From there you can do further ssh connection from the inside of your network or just use the serial console to talk to the router.
Background
We where frustrated at work about the central IT organisation blocking outgoing 123/udp connections. This gave us the idea to buy a GPS controlled NTP server like this one: https://www.meinbergglobal.com/english/products/rack-mount-1u-ntp-server.htm. While doing some research on this subject I found that alot of people seem to build their own stratum 1 NTP servers at home. So I decided to build one myself to use at home.
Basic setup
There is now a new kernel module named gpiopps written by ian@freebsd.org that you can use to get PPS input on any gpio pin. To configure what gpio pin to use you need to rebulid the device tree of your raspberry pi (/usr/src/sys/boot/fdt/dts/arm/rpi2.dts). This is the changes i made:
# cd /usr/src/sys/tools/fdt
# setenv MACHINE arm
# ./make_dtb.sh /usr/src/sys /usr/src/sys/boot/fdt/dts/arm/rpi2.dts rpi2.dtb
# cp rpi2.dtb /boot/msdos
Then you can hook up the pps output of the GPS to gpio pin 17 of your raspberry pi and make sure gpiopps is loaded by adding this line to /boot/loader.conf.
gpiopps_load="YES"
Reboot the pi and then you should see something like this in the boot messages
gpiopps0:  on ofwbus0
gpiopps0: PPS input on gpio0 pin 17
Physical setup
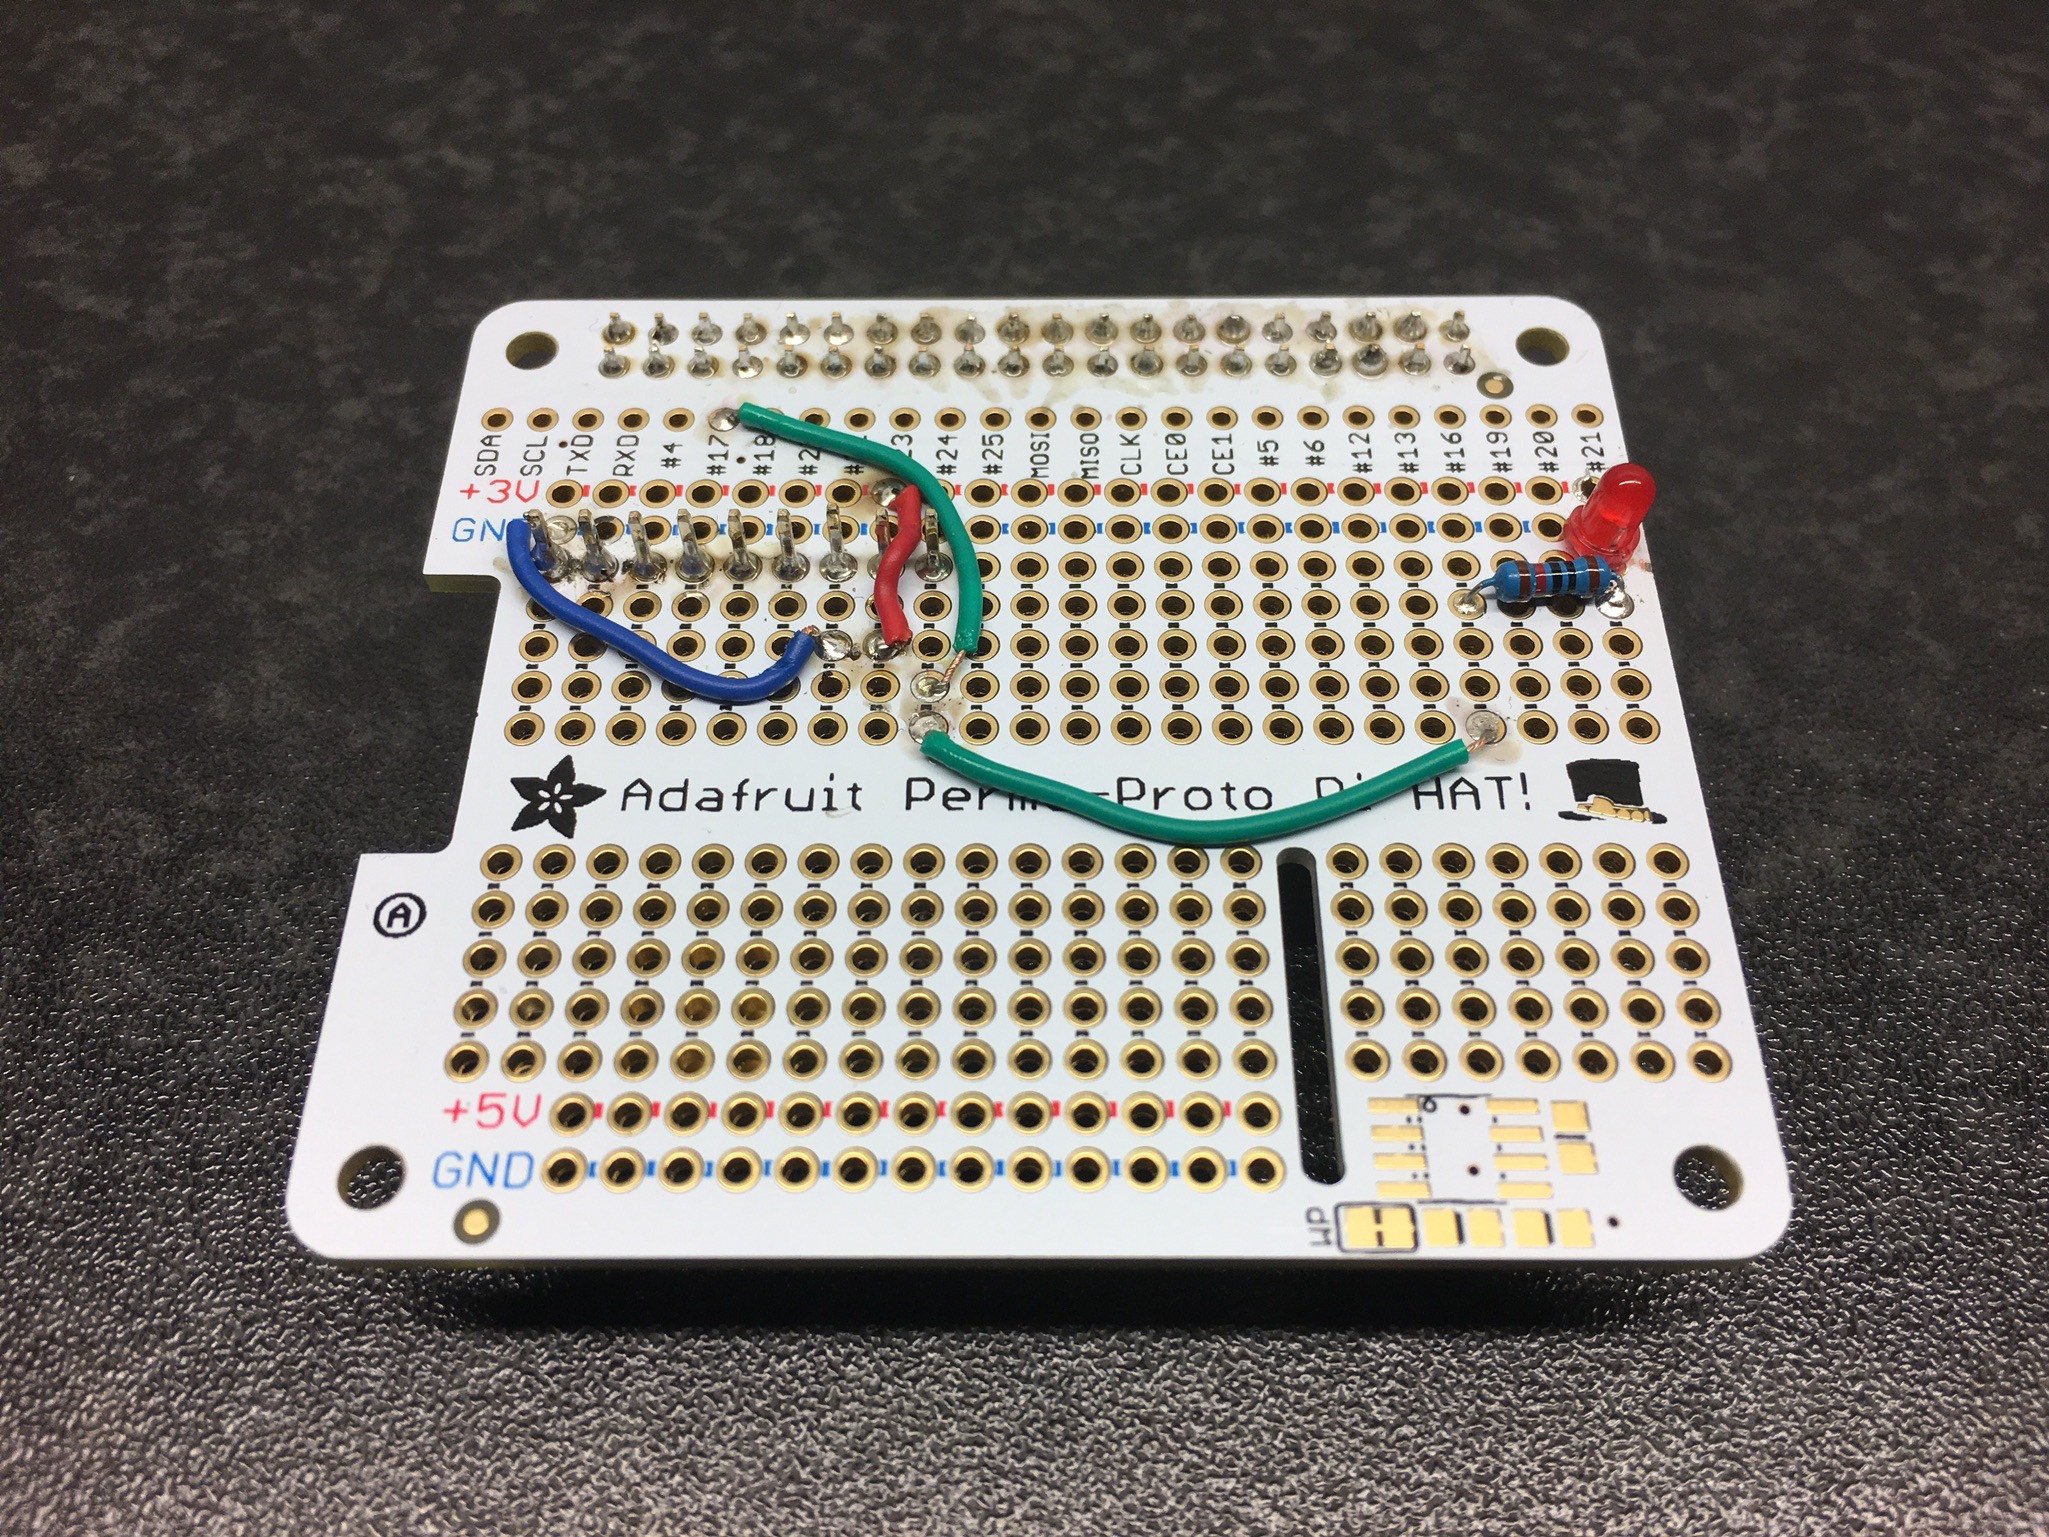
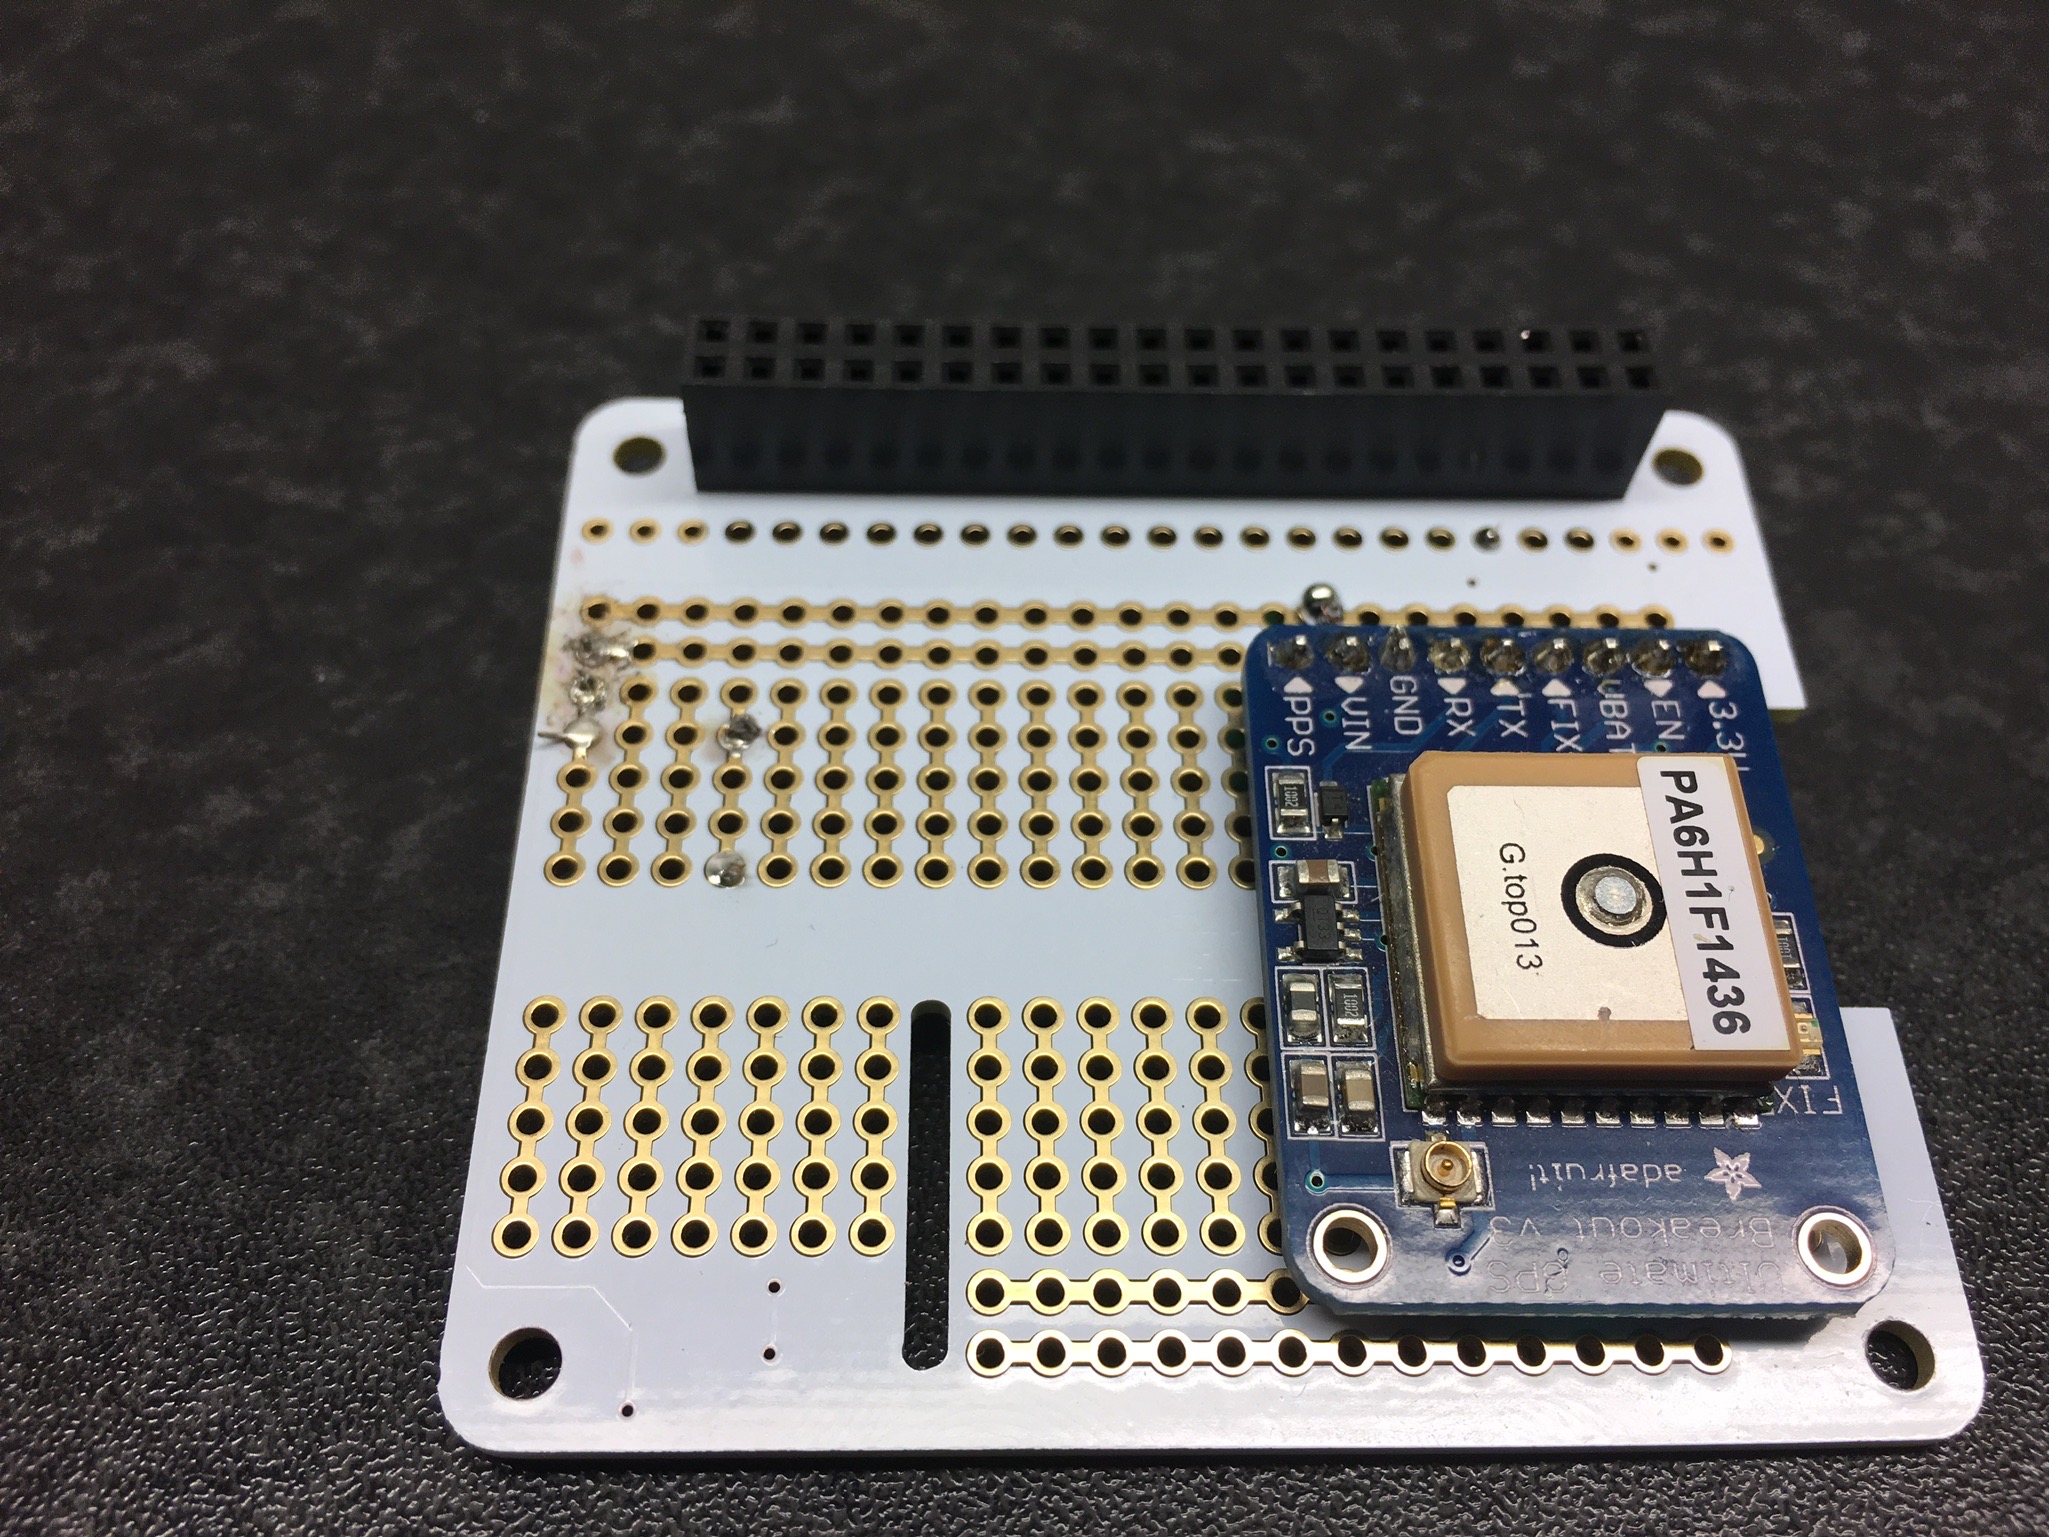
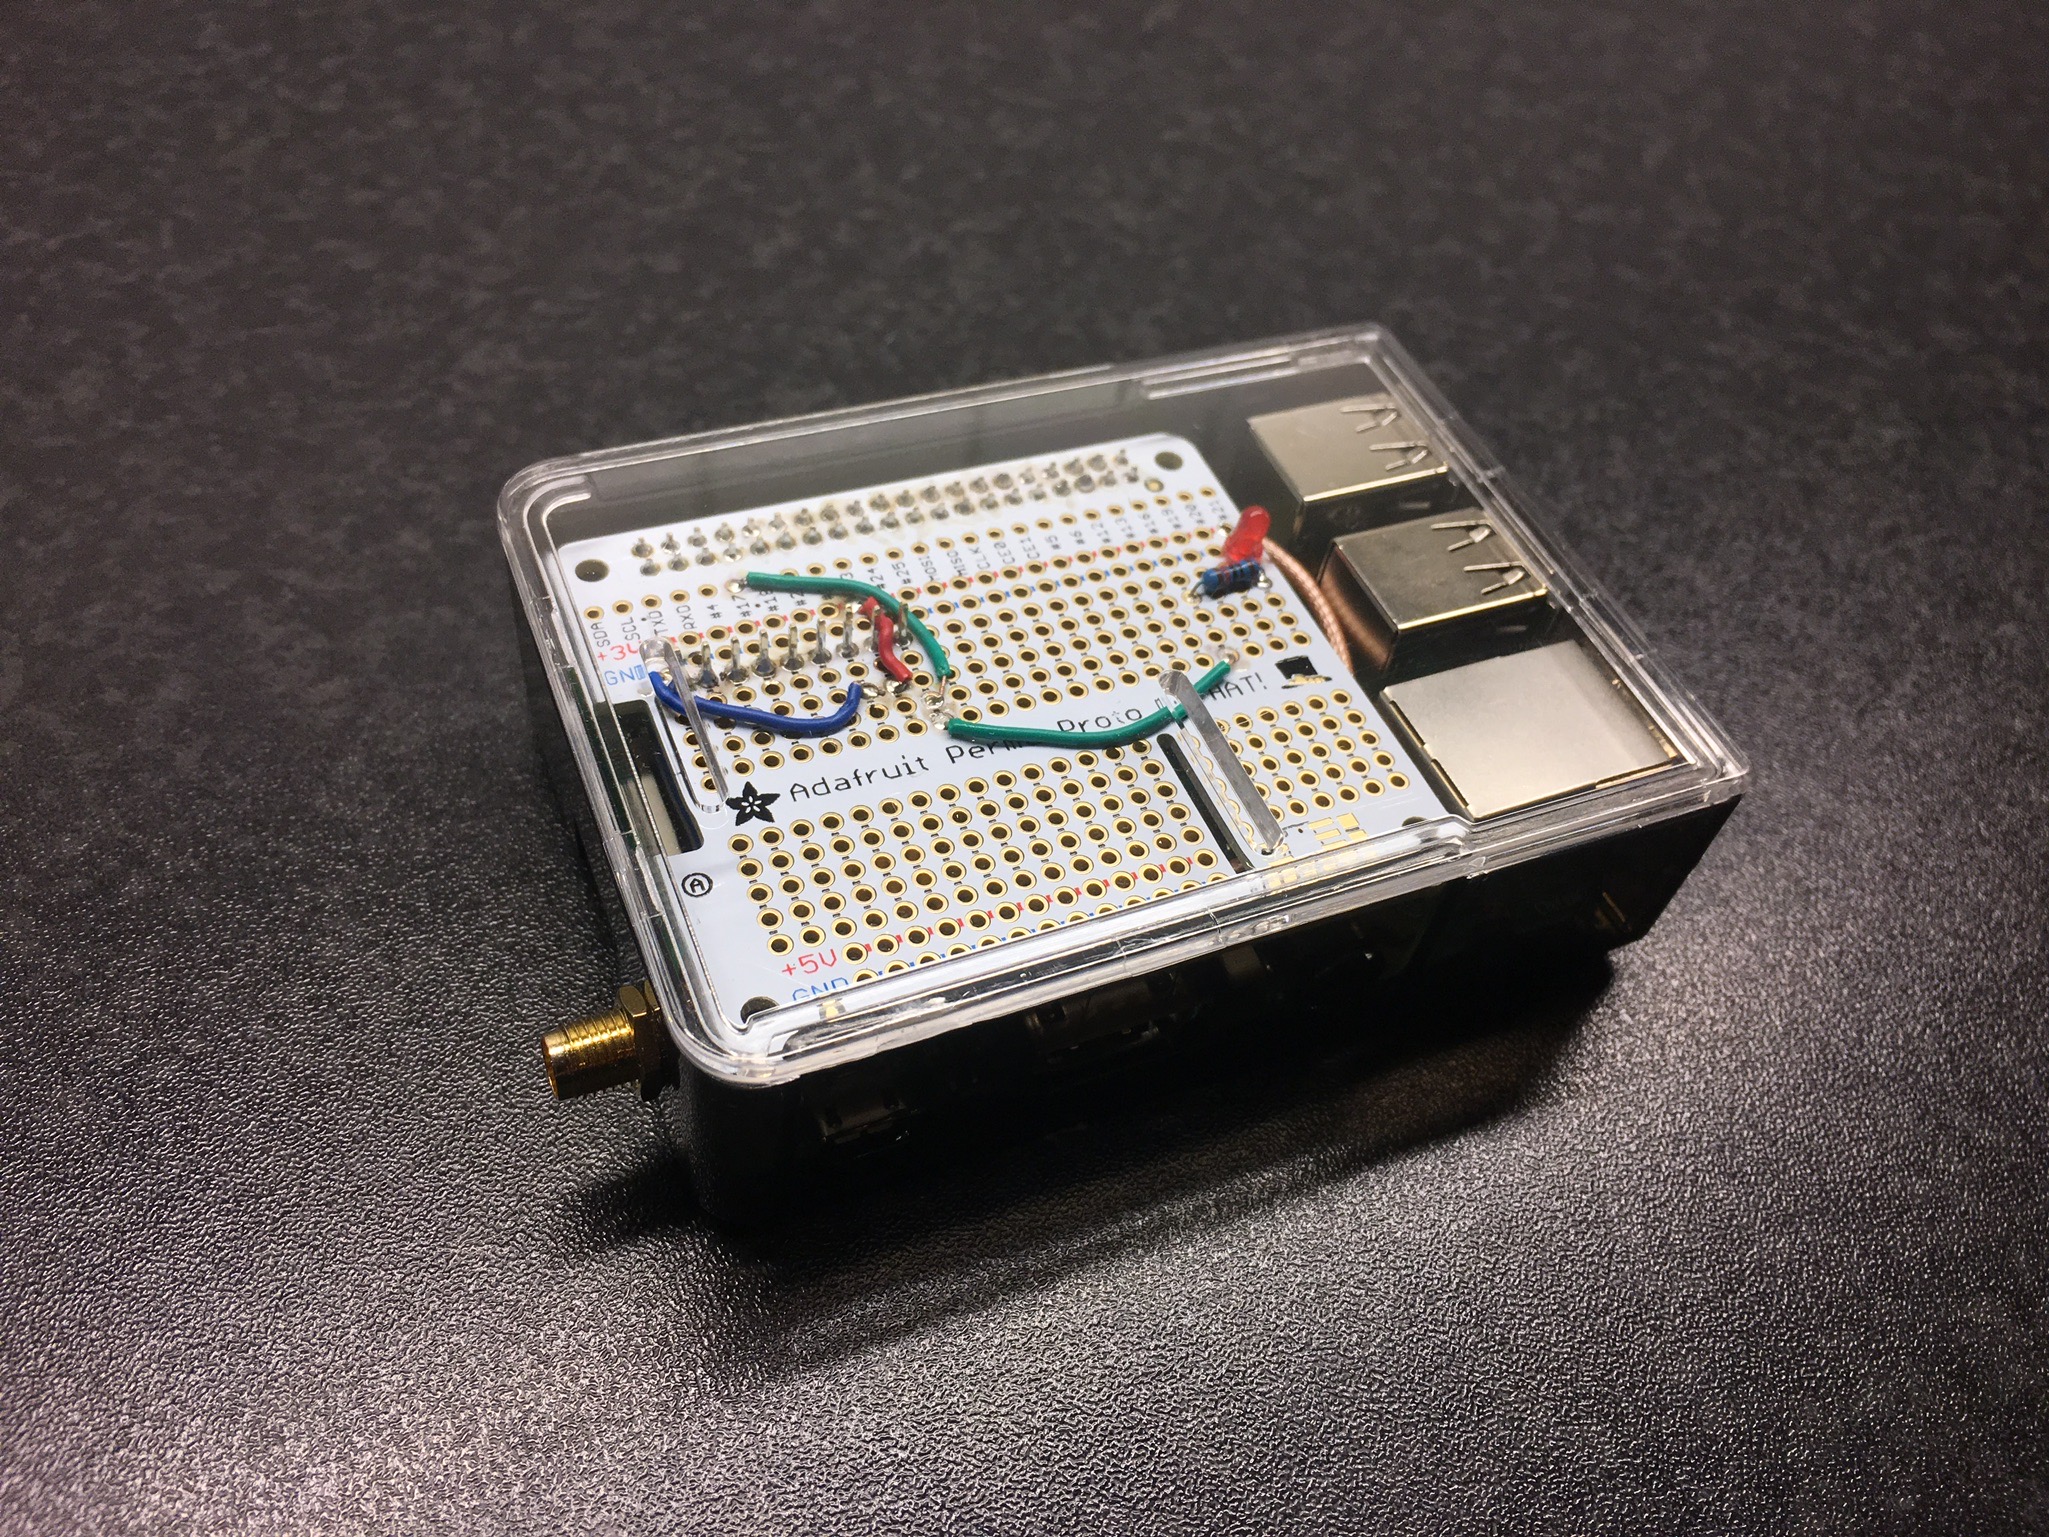
For the physical setup I used the Pi, a case and the “perma proto hat” and did some simple soldering to hook up the serial interface of the GPS to the uart serial interface of the Pi, and of course the PPS output to gpio pin 17. I also added a LED to the pps output so I can visually see when I have a working PPS signal.
Soldered proto hard
GPS soldered to the proto hat
Finished product:
NTP server
GPS configuration
The GPS is actually very easy to talk to. It has a serial interface configured to 9600 baud by default and a dedicated PPS output.
To control the GPS you can send basic text-strings to the unit, for example setting the update rate to 1Hz:
# printf '$PMTK251,57600*2C\r\n' > /dev/cuau0 (Set baudrate to 57600)
# printf '$PMTK314,0,1,0,0,0,0,0,0,0,0,0,0,0,0,0,0,0,0,0*29\r\n' > /dev/cuau0 (ask only for GPRMC sentences)
# printf '$PMTK220,1000*1F\r\n' > /dev/cuau0 (echo sentences once a second)
# printf '$PMTK300,1000,0,0,0,0*1C\r\n' > /dev/cuau0 (update fix once a second)
If you want a complete set of instructions(commands) you can send to device please see the command set sheet.
NTP configuration
I have four different kind of time sources configured on my stratum 1 server.
1. External time sources (internet). In Sweden we have a pretty neat project at ntp.se where they have built custom ntp-servers using FPGAs and atomic clocks.They should be able to server time at 10Gbit/s line rate. You can read more about this here: http://www.ntp.se. I use all of these servers as reference clocks.
2. Local servers that run ntpd. Just my gateway and my server. In the case that all other references fail they can still discipline each other.
3. PPS input from the GPS module. This is the main thing about this article. The GPS outputs a pulse every second that is then used to discipline ntpd.
4. GMEA data from the GPS module. The GPS also outputs coordinates and times on the serial console. But these timestamps are pretty imprecise, at best its close within a second. (But since we also have PPS this is good enough)
You can see my ntp.conf here below but I will only talk about the GPS-stuff from now on.
I use two different drivers in ntpd. 20 and 22. These are the NMEA and PPS drivers. My settings for the PPS driver is pretty basic, it will automatically look for /dev/pps0 and try to fix to a pps signal. The gpiopps driver creates gpiopps0 so I have added “link gpiopps0 pps0” to /etc/devfs.conf
For the NMEA driver we have a few more settings. First of all “mode 17” sets what type of output the look for from the GPS and what baudrate to use. From the driver documentation you find that bit 0 is used to set processing of $GPMRC sentences from the GPS. Bit 4-6 is used to set baudrate and decimal “16” is 9600. So 9600+$GPMRC=17 right? 🙂 This driver looks for /dev/gps0 by default so I have added “link cuau0 gps0” to /etc/devfs.conf
The fudge time2 is used to compensate for the delays we have in the serial interface of the GPS to make it match PPS more closely.
# Allow traffic to external servers
restrict 194.58.203.20 mask 255.255.255.255 nomodify notrap noquery
restrict 194.58.203.148 mask 255.255.255.255 nomodify notrap noquery
restrict 194.58.204.20 mask 255.255.255.255 nomodify notrap noquery
restrict 194.58.204.148 mask 255.255.255.255 nomodify notrap noquery
restrict 194.58.202.20 mask 255.255.255.255 nomodify notrap noquery
restrict 194.58.202.148 mask 255.255.255.255 nomodify notrap noquery
restrict 194.58.205.20 mask 255.255.255.255 nomodify notrap noquery
restrict 194.58.205.148 mask 255.255.255.255 nomodify notrap noquery

# Allow traffic to internal servers
restrict 172.25.0.25 mask 255.255.255.255 nomodify notrap noquery
restrict 172.25.0.1 mask 255.255.255.255 nomodify notrap noquery


# PPS
server 127.127.22.0 flag3 0

# NMEA
server 127.127.20.0 mode 17
fudge 127.127.20.0 time2 +0.767

# Servers
server 194.58.203.20 iburst  prefer
server 194.58.203.148 iburst
server 194.58.204.20 iburst
server 194.58.204.148 iburst
server 194.58.202.20 iburst
server 194.58.202.148 iburst
server 194.58.205.20 iburst
server 194.58.205.148 iburst
server 172.25.0.25
server 172.25.0.1

driftfile /var/db/ntp.drift

# save ntp performance stats
statistics loopstats
statsdir /var/log/ntp/
filegen peerstats file peerstats type day enable
filegen loopstats file loopstats type day enable
filegen clockstats file clockstats type day enable
Running ntpd
So now when we have configured ntpd how does it actually work? This is some output from ntpq -p efter some 30mins of ntpd running:
root@ntp:/dev # ntpq -p
     remote           refid      st t when poll reach   delay   offset  jitter
==============================================================================
 torus.pean.org  172.25.0.10      2 u   20   64  377    0.417    0.816   0.033
 gw.pean.org     172.25.0.10      2 u   18   64  377    0.609    0.462   0.102
oPPS(0)          .PPS.            0 l    5   64  377    0.000    0.133   0.011
xGPS_NMEA(0)     .GPS.            0 l    4   64  377    0.000   62.005   6.586
*gbg1.ntp.se     .PPS.            1 u   21   64  377    7.467    0.052   0.054
+gbg2.ntp.se     .PPS.            1 u   25   64  377    7.514    0.167   0.074
+mmo1.ntp.se     .PPS.            1 u   14   64  377   11.469    0.127   0.221
+mmo2.ntp.se     .PPS.            1 u   22   64  377   11.386    0.152   0.139
+sth1.ntp.se     .PPS.            1 u   12   64  377    2.087    0.130   0.235
+sth2.ntp.se     .PPS.            1 u   17   64  377    2.255    0.158   0.292
-svl1.ntp.se     .PPS.            1 u   13   64  377    6.686   -0.118   1.343
+svl2.ntp.se     .PPS.            1 u    6   64  377    6.015    0.144   1.177
The o in oPPS denotes that ntpd have PPS signal. The x in xGPS_NMEA denotes that this source is marked as a false ticker. The reason for this could be that I have entered a to large fudge factor, its seem to be running 62ms fast at this point. I will keep ntpd running for a few hours and the try to adjust the time fudge accordingly.
I live in a so called “Telia house” (internet, tele and tv are supplied by telia). These services are provided via fiber at my house, and its actually fiber all the way to the patch panel in my apartment. The connection is then coverted from 1000Base-X to 1000Base-T using a media converter from CTS (HET-3012). Maybe a year ago the media converter failed and my connection was down for almost two weeks. It was at that time I got the idea to get rid of the media converter and have the incoming fiber directly connected to my router. This way I could get rid of one possible cause of failure and also save som space in my already packed patch cupboard.
Prerequisites
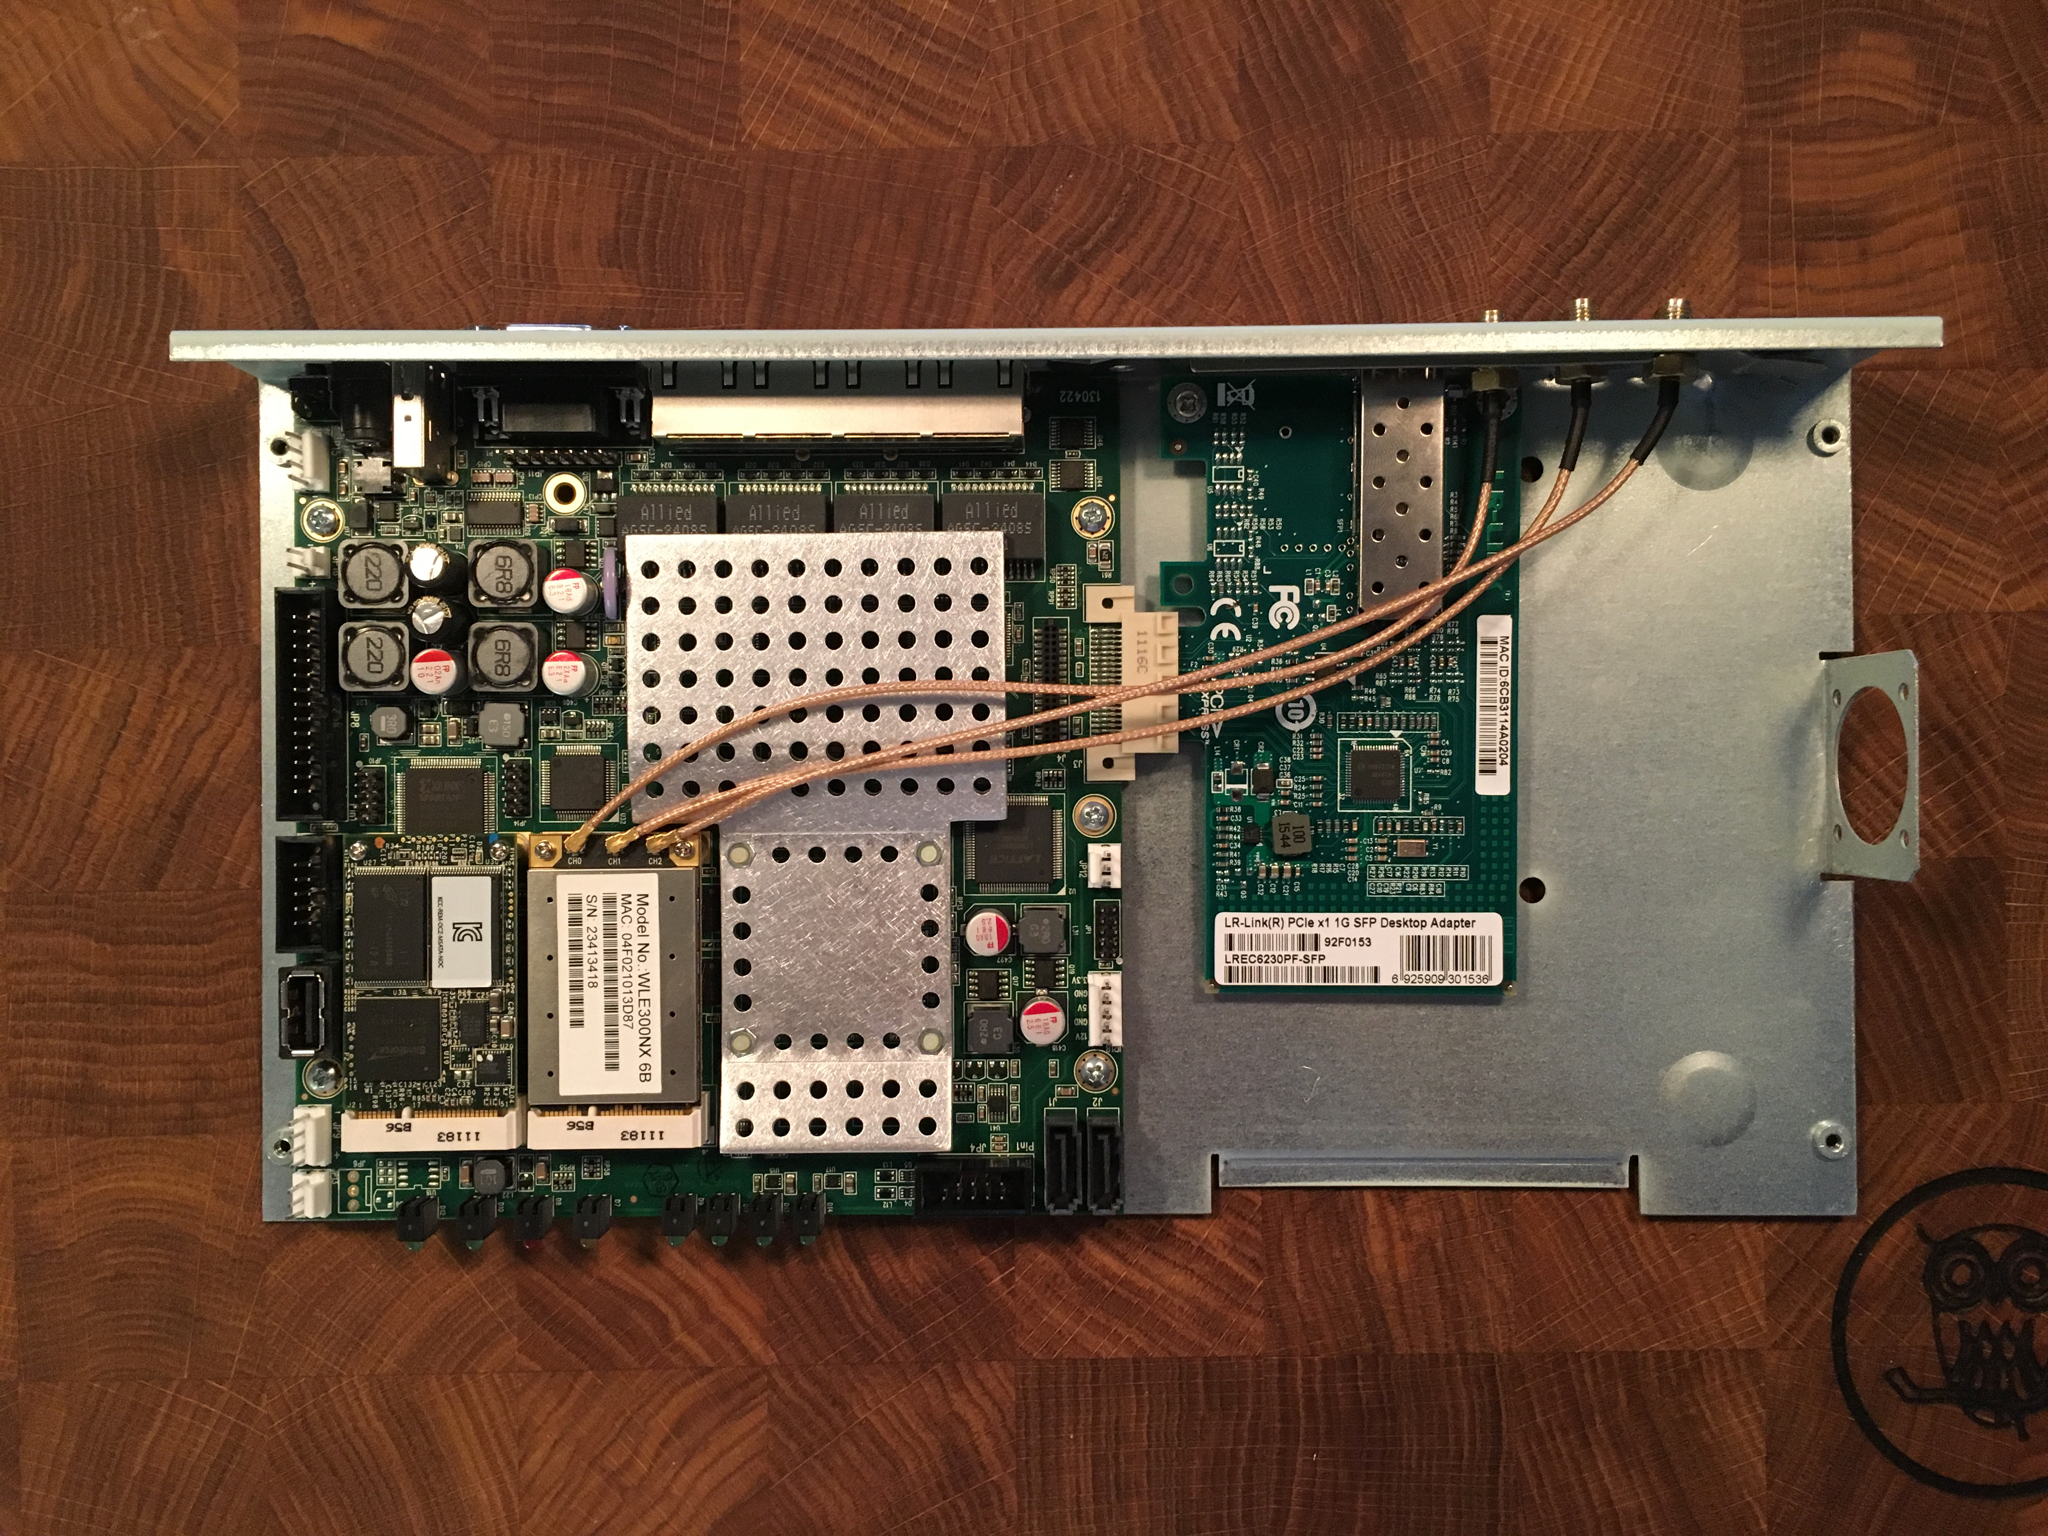
First of all I needed a network card that could fit into my router (a Soekris 6501-50). The soekris have a regular PCI Express 1x interface so it was pretty easy to get a card from ebay. I got a LR-Link LREC6230PF-SFP which used the Intel I210 chip which is well supported in FreeBSD by the igb driver.
Then I needed to find the correct SFP for my application. My first problem was that my incoming fiber uses a single fiber and not a pair, I had never seen something like this. But after some reading on the internet and a quick look at the CTS documentation i found that it uses 1310nm for TX and 1550nm for RX and SC contact. After that is was a simple task to just get a SFP with the correct specs from https://www.direktronik.se
Installation and configuration
When I had the hardware I needed there was no problem installing it. The network card fitted quite nicely in the pretty small case of my Soekris and the SFP worked out of the box.
In order to load the driver for this specific card at boot I added this line to /boot/loader.conf
if_igb_load="YES"
Since I wanted to keep my “old” IP adress I configured the same mac-adress on the new card as on the old card. (And yes, I also changed the mac of the old card to avoid conflicts).
rc.conf:
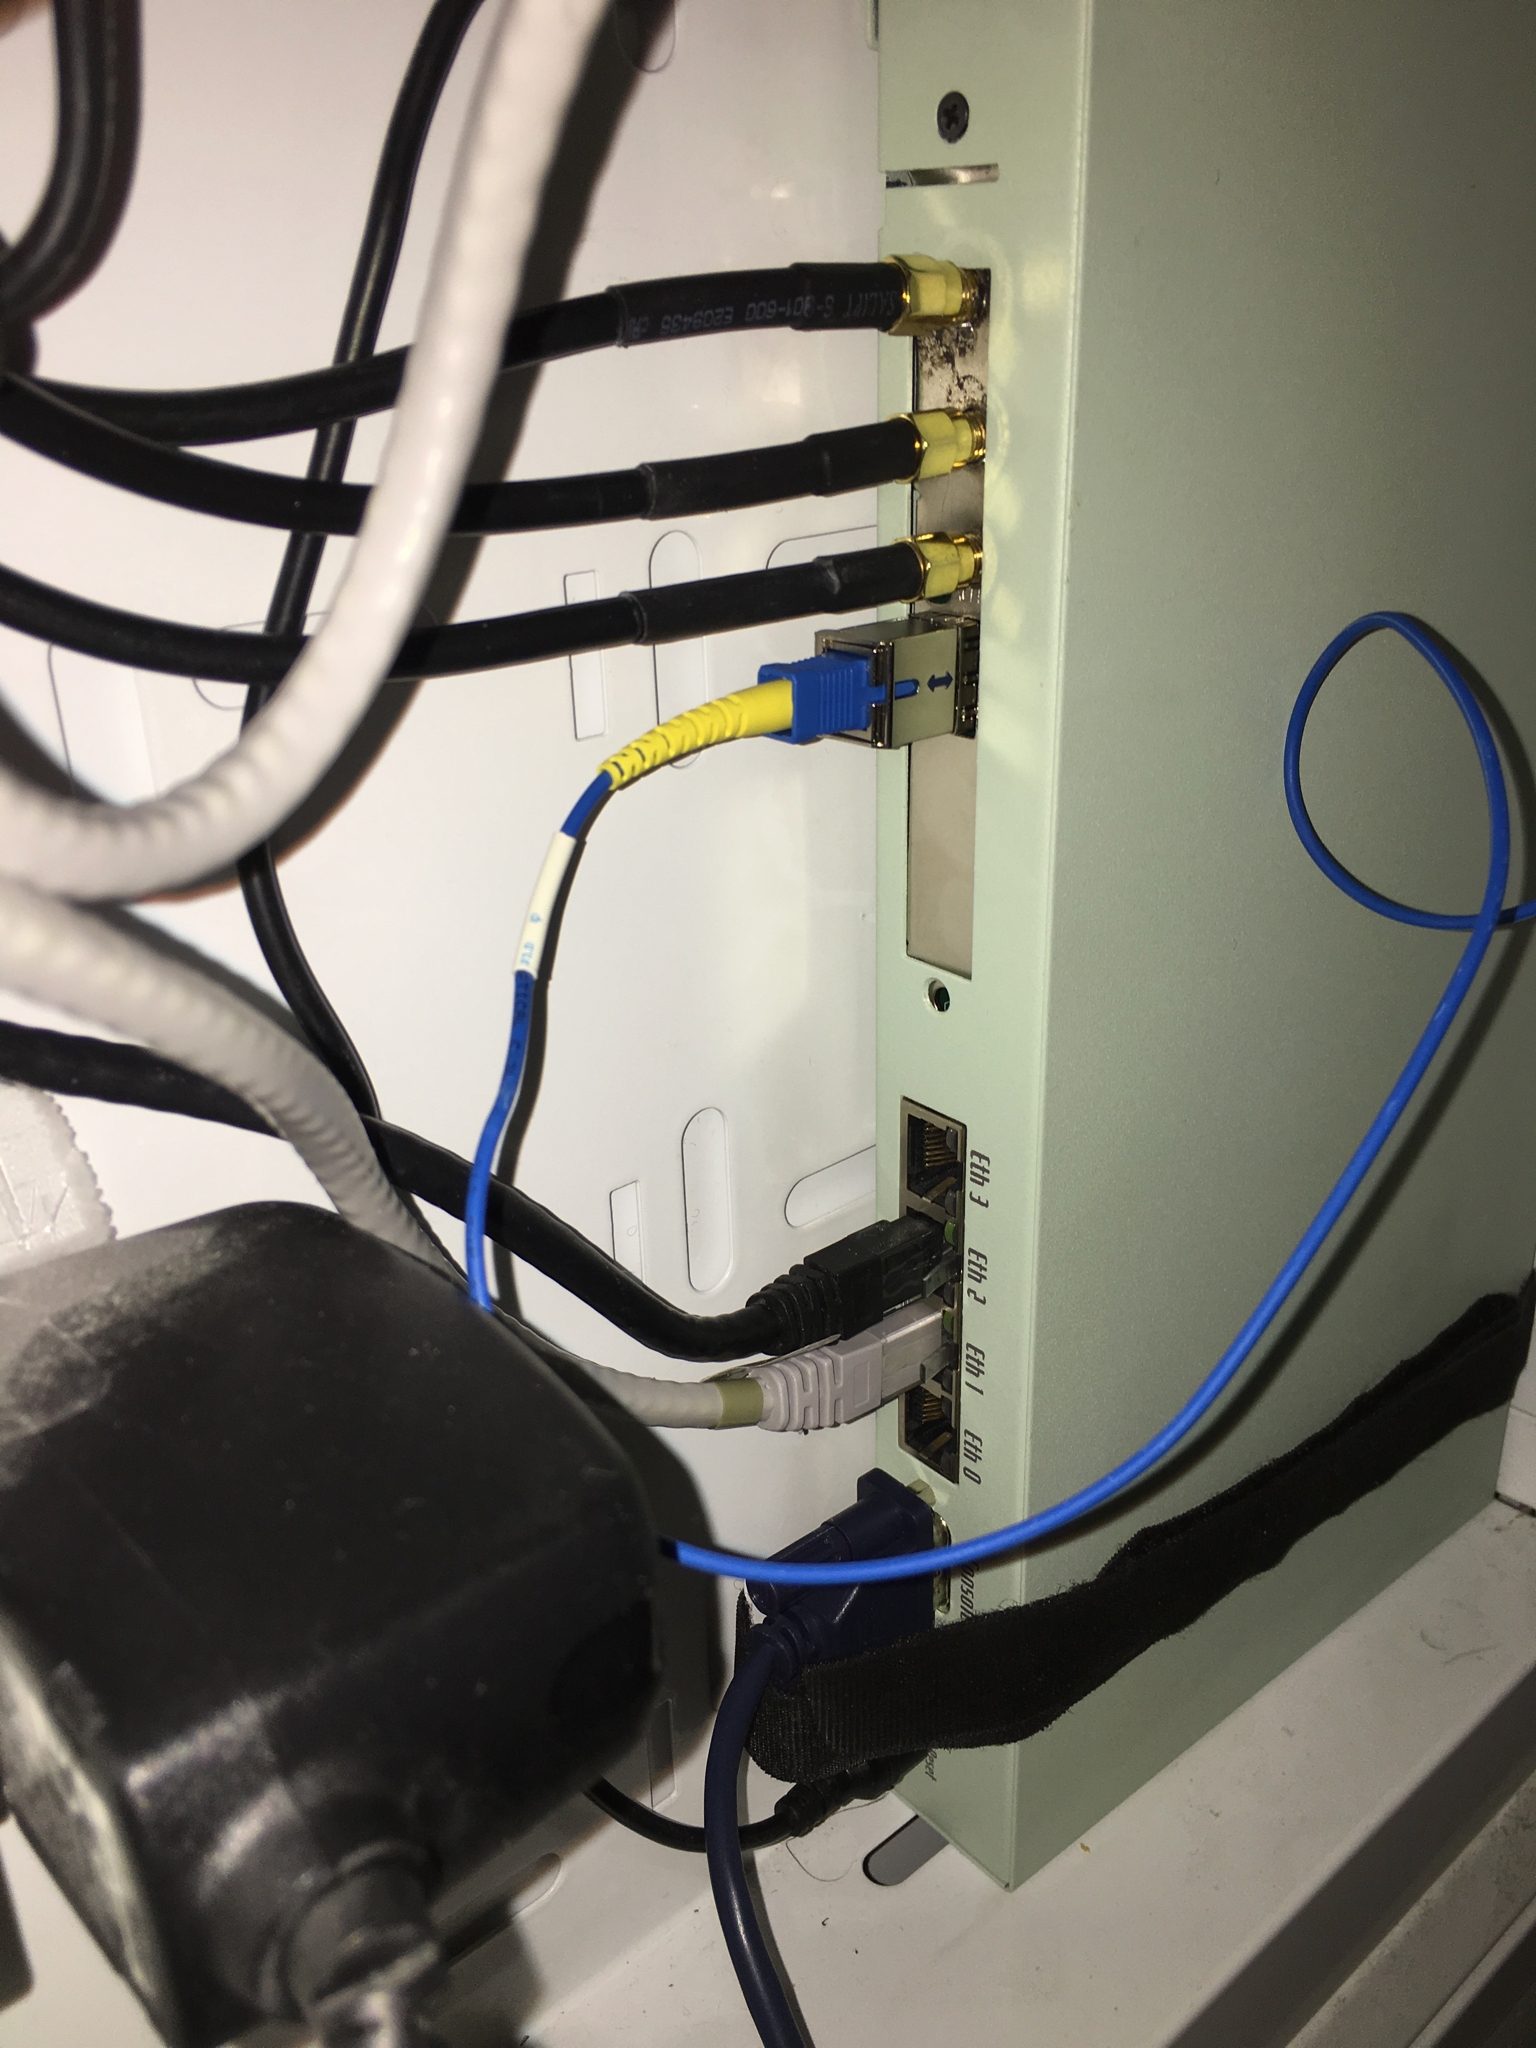
And this is how the final result looks like inside the patch cupboard. The three black cables are antenna cables for the wifi. You can read more about the general setup of my router here.
Depending on the use case, SSH CA keys can be extremely sensitive. Possession of the private key gives you the ability to sign new certificate for arbitrary usernames that will grant access to all machines where this CA is trusted. This is why you should keep your CA keys very safe, preferably offline and of course encrypted (password protected).
One big problem with digital encryption keys is that it is extremely difficult to find out if you lost control over they keys. If they where copied you have no way of finding out. This is where hardware tokens comes in. If you can be sure that the key will never leave the hardware token, you have a better chance of knowing when they keys are lost or stolen.
OpenSSH have support for storing keys onto hardware tokens that talk PKCS#11 such as smart cards and hardware security modules.
Since a SSH CA is just a regular SSH key they can also be stored on smart cards. But there is a few subtle differences in how you use it. First of all you need a token with a RSA key present. There is no option in OpenSSH to ask for a specific key stored on the token, instead we specifiy the public key that matches the private key we want to use. Lets download the public key from the token:
We put this into a file, let say ssh_ca.pub. Now we are ready to start using the token for certificate signing.
$ ssh-keygen -s ssh_ca.pub -D /usr/local/lib/opensc-pkcs11.so -I key_id wack.pub
Enter PIN for 'Framkant HSM Test (UserPIN)':
Signed user key wack-cert.pub: id "key_id" serial 0 valid forever
Are you managing a couple of machines over ssh and have begun to feel frustrated about the key management? Find it tedious to distribute your public key to every machine you want to administer? Well, there is a simple solution, that does not include LDAP or some other central authentication server. A little known fact is that OpenSSH have support for both server and client certificates (not x509) since version 5.4. These can be used to set up a trusted Certificate authority on every server once and for all.
This is a very useful tool in environments where server access are harmonized (Where the same set of users should have access to all servers).
The other part is the signing of host keys. This solves the problem of having to manually check and verify the host key fingerprint every time you connect to a new server. If the server key is signed by a CA that you choose to trust you will not be asked to verify the fingerprint. If you have some configuration orchestration like Puppet you can have the puppetmaster create the host certificates on the fly.
* Add support for certificate authentication of users and hosts using a
   new, minimal OpenSSH certificate format (not X.509). Certificates
   contain a public key, identity information and some validity
   constraints and are signed with a standard SSH public key using
   ssh-keygen(1). CA keys may be marked as trusted in authorized_keys
   or via a TrustedUserCAKeys option in sshd_config(5) (for user
   authentication), or in known_hosts (for host authentication).
Creating CA keys
First of all I strongly recommend that you create separate CA keys for hosts and users for security reasons.
The CA keys are just regular ssh keys, you can create them like this:
$ ssh-keygen -a 256 -o -t rsa -b 4096 -f user_ca
Generating public/private rsa key pair.
Enter passphrase (empty for no passphrase):
Enter same passphrase again:
Your identification has been saved in user_ca.
Your public key has been saved in user_ca.pub.

$ ssh-keygen -a 256 -o -t rsa -b 4096 -f host_ca
Generating public/private rsa key pair.
Enter passphrase (empty for no passphrase):
Enter same passphrase again:
Your identification has been saved in host_ca.
Your public key has been saved in host_ca.pub.
Securing the private key
Since we are in the process of essentially giving one ssh key access to all of our severs we want keep the private key used for certificate signing very secure. The absolute minimum is to have the key encrypted (password protected). But other than that you should also enable KDF which you can read more about here. I also recommend that you store your keys offline and only have them mounted to a system when you use them. One way could be a encrypted partition on a USB drive, but have two of them since USB drives have a tendency to fail.
Another way to secure your keys is to have them stored on a hardware token, you can read about that here.
Singning your ssh key
First of all you need a regular ssh key which you create with ssh-keygen. Then we can sign this key and create a certificate. This is also done with ssh-keygen:
$ ssh-keygen -s /path/to/ca_key -n peter -z 1234 -V +52w1d-I key_id /path/to/user_key.pub
Signed user key user_key-cert.pub: id "peter_cert" serial 1234 for peter valid from 2016-10-09T22:23:00 to 2017-10-09T22:24:57
The file user_key-cert.pub can now be used together with your private key to access machines that accept the user_ca.pub.
To look at the newly created certificate run:
% ssh-keygen -L -f user_key-cert.pub
wack-cert.pub:
        Type: ssh-rsa-cert-v01@openssh.com user certificate
        Public key: RSA-CERT SHA256:AtPyAu1DL5cFruTo9XnsVz7tdec7xF9SbpX8DzsQrbs
        Signing CA: RSA SHA256:8PYQAJojSknTl3BqgBkFKigmaufDhL/7d8zYUNFm7Po
        Key ID: "peter_cert"
        Serial: 1234
        Valid: from 2016-10-09T22:23:00 to 2017-10-09T22:24:57
        Principals:
                peter
        Critical Options: (none)
        Extensions:
                permit-X11-forwarding
                permit-agent-forwarding
                permit-port-forwarding
                permit-pty
                permit-user-rc
Singning host keys
The signing of host keys is done exactly as above, the only difference is that you add -h and the value given to -n should be the hostname.
Configure sshd
To tell sshd to accept key signed with your newly created ca you just need to upload the user_ca.pub and add one line to sshd_config. To tell the server to provide a host certificate to the client you need to add one line per key type to the configuration.
Configure the client to accept host certificates
To accept host certificates signed by the host_ca you need to add a line to your known_hosts file.
Its just @cert-authority * < public key >
Ever had second thoughts on paying a certificate authority (CA) a lot of money to sign your web servers public encryption key to get a trusted certificate? With the birth of DNSSEC the need for this could fade away, at least partly. It is now possible to create a self signed certificate and post the signatures securely in DNS. This way there is a secure out of band method to check the validity of a certificate. There is a special record type for this called TLSA and you can read more about it in RFC 6698
The support for these records in todays browsers are very limited, but there is a plugin available for the most popular browsers called DNSSEC validator. With this plugin it is possible to get a green light, even with a self signed certificate.
If you run your own mail server it could be interesting to know that Postfix have support for TLSA records since a few versions back.
_443._tcp tells us that a certificate with this sha-512 hash should be handed to us if we connect to tcp port 443.
There are three options before the hash. The first option defines “certificate usage”, the second “TLSA selector” and the third is basically hash type. The fourth field is the actual hash of the certificate. In the above example we have a sha-512 of the full certificate of a “Domain-issued certificate”. Please read more about this in the RFC (section 7).
Using the *nix command host the fetch this record looks like this
> host -t tlsa _443._tcp.framkant.org.
_443._tcp.framkant.org has TLSA record 3 0 2 4FB72400493E364A499B24CDC5E5715F97543262CBCB90C8483C5AB3 E8A37C9ECC4E021C8C12B3E485CFF3A082348FE6ED39EBBF2F812B3B A8857DBB1C96AFF0
It is pretty easy to find out the hash of a certificate using openssl. The following command gives us the sha512 hash of a certificate from file.
Remember that for this to have any effect on your security or your ability to have self signed certificates you need to have DNSSEC up and running for your domain. Please have a look at my article about OpenDNSSEC if you run your own authoritative dns server.
After setting up my wireless FreeBSD router I wanted to secure my wireless network with WPA2 Enterprise.
I’ve had a really hard time finding any good documentation on hostapd, but I finally got it to work. So why would you use WPA2 Enterprise, isnt Personal good enough? Well, the problem is these days that anyone can set up a wireless network with the same name as yours. If you connect to this fake network beliving you are connected to your own someone have full access to everything you send and receive. WPA2 Enterprise fixes this because the access point also has to prove its identity by providing a valid SSL Certificate. If this certificate changes you will be notified right away.
So, how do you set it up in hostapd? Well, its not that complex at all, the problem is that you cant find any documentation on it.
Configuration
Here is my configuration for WPA2 Enterprise. This uses hostapds own internal RAIDUS-server but you could as well use FreeRADIUS or some other RADIUS server out there, but then you’ll have to figure out how to configure that in hostapd. 😀
/etc/hostapd.conf
interface=wlan0
driver=bsd
ctrl_interface=/var/run/hostapd
ctrl_interface_group=wheel
ssid=web
wpa=2
wpa_key_mgmt=WPA-EAP
wpa_pairwise=TKIP CCMP
macaddr_acl=0
auth_algs=1
own_ip_addr=127.0.0.1
ieee8021x=1
eap_server=1
eapol_version=1

# Path for EAP server user database
eap_user_file=/etc/hostapd_eap_user
ca_cert=/etc/ssl/startssl.ca.pem
server_cert=/etc/ssl/domain.tld.crt
private_key=/etc/ssl/domain.tld.key
You can also set up it to require client certificate to connect to make it even more “secure”. It all depends on how you handle your certificates and passwords.
One of my hobby projects is to build a “fully fledged” wireless FreeBSD router. To do this I got a Soekris 6501-50 which has four gigabit ports and two mini PCIe slots.
For storage I have a small 30GB miniPCIe SSD (OCZ-NOCTI). I have two wireless cards installed one dual band 3x3MIMO minipcie card from COMPEX (When FreeBSD gets up to speed with 802.11ac I will upgrade to a WLE900VX) and for legacy 2.4Ghz I use a TPLINK TL-WN781ND. These two cards are then used for two virtual interfaces each, one for my primary wlan and one for my guest wlan.
Atennas
One important part of the wireless part of the router is the antennas. For a long time I used three consumer antennas (ALLNET ALL19003) for 5GHz use for my COMPEX card, but when I moved to a new apartment and switched to 5GHz I didnt get good speeds everywhere in the apartment. This got me thinking about a ceiling antenna. But I found it very hard to find one in consmer stores, so I turned to Ebay. I found a decently cheap Laird S2451DBT 6port antenna which is now mounted in the ceiling at a central point of the apartment.
Firewall
To do packet filtering I use the OpenBSD derived pf(4) which has been in FreeBSD for a long time now.
Wireless networks
Like I told you in earlier I have two physical cards and two networks (ssid). One primary and one guest networks with tighter rules but less strict authentication.
The firt step here is to find a card supported by FreeBSD, but also have support for hostap mode, obviously mine does. To get it to run WPA2 Personal on a specific channel the configuration is very easy
Lately I started to use the more secure WPA2 Enterprise and you can read about my configuration here
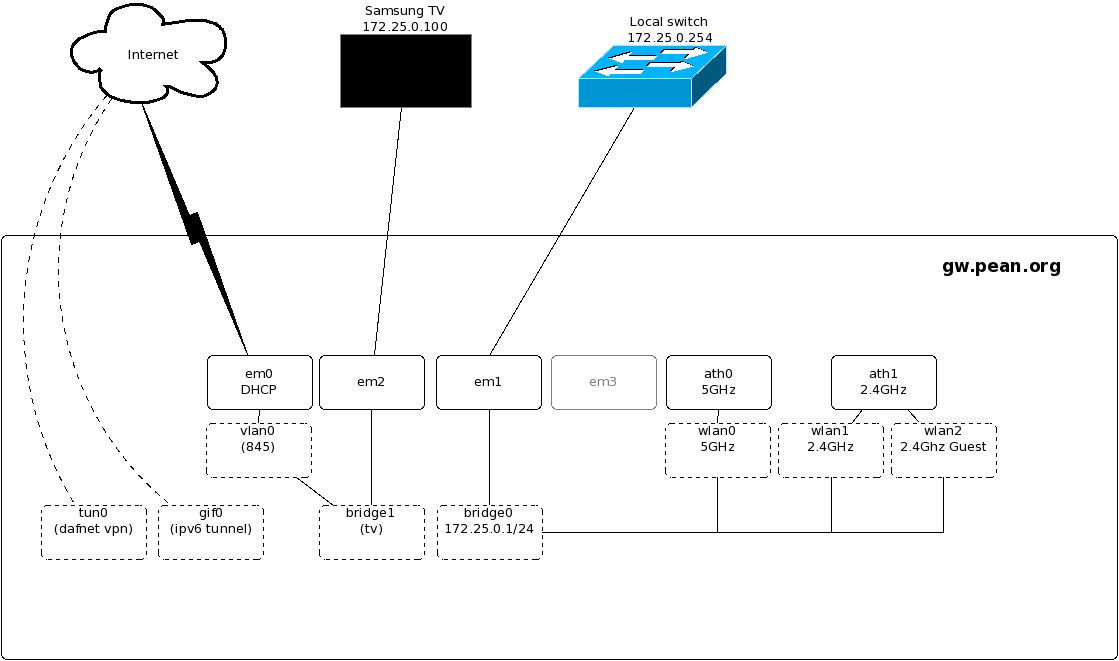
Other networks
My internet provider is Telia and I have something they call Triple Play.. (Internet, TV and Tele in the same cable). In order to get this to work you should use their Thompson router that has som magic for splitting up your one incoming fiber into three different networks. After some reading on the interwebs I found out this is really just tagged vlans and I can split them myself without any problem. “Internet” comes untagged and the IPTV traffic comes in on tag 845, so I just create a vlan interface with my external interface as parent and then bridge this interface to one of my internal interfaces on the Soekris. (and of coruse connect the IPTV-box to this port). You can read more about this configuration here (swedish)