Setting up a SSH Certificate Authority (CA)

Are you managing a couple of machines over ssh and have begun to feel frustrated about the key management? Find it tedious to distribute your public key to every machine you want to administer? Well, there is a simple solution, that does not include LDAP or some other central authentication server. A little known fact is that OpenSSH have support for both server and client certificates (not x509) since version 5.4. These can be used to set up a trusted Certificate authority on every server once and for all.

This is a very useful tool in environments where server access are harmonized (Where the same set of users should have access to all servers).

The other part is the signing of host keys. This solves the problem of having to manually check and verify the host key fingerprint every time you connect to a new server. If the server key is signed by a CA that you choose to trust you will not be asked to verify the fingerprint. If you have some configuration orchestration like Puppet you can have the puppetmaster create the host certificates on the fly.

From the release notes of OpenSSH 5.4:

* Add support for certificate authentication of users and hosts using a
   new, minimal OpenSSH certificate format (not X.509). Certificates
   contain a public key, identity information and some validity
   constraints and are signed with a standard SSH public key using
   ssh-keygen(1). CA keys may be marked as trusted in authorized_keys
   or via a TrustedUserCAKeys option in sshd_config(5) (for user
   authentication), or in known_hosts (for host authentication).

Creating CA keys
First of all I strongly recommend that you create separate CA keys for hosts and users for security reasons.

The CA keys are just regular ssh keys, you can create them like this:

$ ssh-keygen -a 256 -o -t rsa -b 4096 -f user_ca
Generating public/private rsa key pair.
Enter passphrase (empty for no passphrase): 
Enter same passphrase again: 
Your identification has been saved in user_ca.
Your public key has been saved in user_ca.pub.

$ ssh-keygen -a 256 -o -t rsa -b 4096 -f host_ca
Generating public/private rsa key pair.
Enter passphrase (empty for no passphrase): 
Enter same passphrase again: 
Your identification has been saved in host_ca.
Your public key has been saved in host_ca.pub.

Securing the private key
Since we are in the process of essentially giving one ssh key access to all of our severs we want keep the private key used for certificate signing very secure. The absolute minimum is to have the key encrypted (password protected). But other than that you should also enable KDF which you can read more about here. I also recommend that you store your keys offline and only have them mounted to a system when you use them. One way could be a encrypted partition on a USB drive, but have two of them since USB drives have a tendency to fail.

Another way to secure your keys is to have them stored on a hardware token, you can read about that here.

Singning your ssh key
First of all you need a regular ssh key which you create with ssh-keygen. Then we can sign this key and create a certificate. This is also done with ssh-keygen:

$ ssh-keygen -s /path/to/ca_key -n peter -z 1234 -V +52w1d-I key_id /path/to/user_key.pub
Signed user key user_key-cert.pub: id "peter_cert" serial 1234 for peter valid from 2016-10-09T22:23:00 to 2017-10-09T22:24:57

The file user_key-cert.pub can now be used together with your private key to access machines that accept the user_ca.pub.

To look at the newly created certificate run:

% ssh-keygen -L -f user_key-cert.pub 
wack-cert.pub:
        Type: ssh-rsa-cert-v01@openssh.com user certificate
        Public key: RSA-CERT SHA256:AtPyAu1DL5cFruTo9XnsVz7tdec7xF9SbpX8DzsQrbs
        Signing CA: RSA SHA256:8PYQAJojSknTl3BqgBkFKigmaufDhL/7d8zYUNFm7Po
        Key ID: "peter_cert"
        Serial: 1234
        Valid: from 2016-10-09T22:23:00 to 2017-10-09T22:24:57
        Principals: 
                peter
        Critical Options: (none)
        Extensions: 
                permit-X11-forwarding
                permit-agent-forwarding
                permit-port-forwarding
                permit-pty
                permit-user-rc

Singning host keys
The signing of host keys is done exactly as above, the only difference is that you add -h and the value given to -n should be the hostname.

Configure sshd
To tell sshd to accept key signed with your newly created ca you just need to upload the user_ca.pub and add one line to sshd_config. To tell the server to provide a host certificate to the client you need to add one line per key type to the configuration.

TrustedUserCAKeys /etc/ssh/user_ca.pub
HostCertificate /etc/ssh/ssh_host_rsa_key-cert.pub
HostCertificate /etc/ssh/ssh_host_ecdsa_key-cert.pub
HostCertificate /etc/ssh/ssh_host_ed25519_key-cert.pub

and restart sshd.

Configure the client to accept host certificates
To accept host certificates signed by the host_ca you need to add a line to your known_hosts file.
Its just @cert-authority * < public key >

It should look something like this:

@cert-authority * ssh-rsa AAAAB3NzaC1yc2EAAAADAQABAAACAQC3pcm4IJGw76YKZSrf7pZA6s3Hu9eRzKbyzKPgg5OkBWU9ztUz2e1bXtR0UDqQKuOUx+ZDx6wmR3rVRM/BhYt1oeAv6rhxNRW2XPiakpn3EzuEWlbp68QRY8p+k6gjy7cnvF2uyaP0R0Ov819tTMHkdS3Rn57m7pfFk+tuRKLjJnQN2g6uxT+PBJonTQr2XcS5oAzwjel1x7xLqmz0MMrE98uE0GaZHxf/hioXOHt1ihzTF+GPqZ31ZrR3GIWtFEKtvcroaiS25VIV9W39LfVh7RRZTh8oCrjcEdoeFKUKA1PpqblsJhqg1XU2/xa9CAKb6SHb7gwQ18nUaQ/Sk6qYJMgkwWUtXbwS1RIm1k5QlKk8VD4H10jyqiAUBC8SHfNxnqOwKe275AfOVc/iuh4F2NsrIuHfh8tno5LqWSP63D3gXpXXm/4j3Sop2NqNz6EIqoqj0HPIL21/SneJgWXS7xxV/ShgnLVGB0dsJf8PsCnsVt0s5thO22VvE/IVQ1KM/ac1lEafBeSZsuPiOfcIeZu9mm4DfuoyqaHmnV6yBguW6zb894IdcYXsrVnMy3Hp85gnymEZn/qfPJ+dhNbBAANgjWphz5ZaBKdrpgCESz8Ka9S6V7fXr2ikB21YiUKB7XuoPjDncOokSEHU0p5iMQjE+Le7K3nOTtokhrZjXw==

Revoking Certificates
This will be added later.
Publish certificate fingerprints in DNS (TLSA/DANE)

Ever had second thoughts on paying a certificate authority (CA) a lot of money to sign your web servers public encryption key to get a trusted certificate? With the birth of DNSSEC the need for this could fade away, at least partly. It is now possible to create a self signed certificate and post the signatures securely in DNS. This way there is a secure out of band method to check the validity of a certificate. There is a special record type for this called TLSA and you can read more about it in RFC 6698

The support for these records in todays browsers are very limited, but there is a plugin available for the most popular browsers called DNSSEC validator. With this plugin it is possible to get a green light, even with a self signed certificate.

If you run your own mail server it could be interesting to know that Postfix have support for TLSA records since a few versions back.

A TLSA record could look like this:

_443._tcp TLSA (3 0 2 4FB72400493E364A499B24CDC5E5715F
                      97543262CBCB90C8483C5AB3E8A37C9E
                      CC4E021C8C12B3E485CFF3A082348FE6
                      ED39EBBF2F812B3BA8857DBB1C96AFF0)

_443._tcp tells us that a certificate with this sha-512 hash should be handed to us if we connect to tcp port 443.

There are three options before the hash. The first option defines “certificate usage”, the second “TLSA selector” and the third is basically hash type. The fourth field is the actual hash of the certificate. In the above example we have a sha-512 of the full certificate of a “Domain-issued certificate”. Please read more about this in the RFC (section 7).

Using the *nix command host the fetch this record looks like this

> host -t tlsa _443._tcp.framkant.org.
_443._tcp.framkant.org has TLSA record 3 0 2 4FB72400493E364A499B24CDC5E5715F97543262CBCB90C8483C5AB3 E8A37C9ECC4E021C8C12B3E485CFF3A082348FE6ED39EBBF2F812B3B A8857DBB1C96AFF0

It is pretty easy to find out the hash of a certificate using openssl. The following command gives us the sha512 hash of a certificate from file.

> openssl x509 -noout -fingerprint -sha512 -in framkant.crt | tr -d :

Remember that for this to have any effect on your security or your ability to have self signed certificates you need to have DNSSEC up and running for your domain. Please have a look at my article about OpenDNSSEC if you run your own authoritative dns server.

Protect your private SSH-key with KDF (key derivation function)

Ever heard someone saying that using ssh-keys is a perfect way to have “passwordless” logins to servers? Probably you have. There is a big problem with this approach (I will ignore ssh-agents and stuff like this in this article). If you really want a completley passwordless login, you will need to store the private key unencrypted. The key can be stolen without you knowing it and the attacker could use it “as is”.

The first countermeasure is to encrypt the key and protect it with a passphrase. But since the key is just a file without any brute force protection it could (if the passphrase is weak or semiweak) be very easy to crack the key open. The encryption key used is just a md5 hash of your passphrase and md5 is… fast. Since OpenSSH 6.5 there is a bettery way to protect your ssh-keys. A new private key format is used where you can apply KDF (key deviation function) to slow down the decryption of your private key.

To create a key in the new format with KDF applied you use -o for the new key format and -a specify how many rounds of KDF to use. (more rounds is slower to decrypt)

> ssh-keygen -a 256 -o -t rsa -b 4096 -f test
Generating public/private rsa key pair.
Enter passphrase (empty for no passphrase): 
Enter same passphrase again: 
Your identification has been saved in test.
Your public key has been saved in test.pub.
The key fingerprint is:
45:20:9e:50:d2:6e:c9:11:bb:3a:fe:1c:a3:c6:93:48 peter
The key's randomart image is:
+--[ RSA 4096]----+
|    oo+....      |
|     +o+ .       |
|     o+o  .      |
|      =. .       |
|     .. S        |
|  E  .           |
| . oo.o          |
|  ..=+ o         |
|   .ooo          |
+-----------------+

How many rounds to use depends on your environment and how concerned you are about losing your private keys. 256 rounds on a reasonable modern computer takes me ~4s to decrypt. This is a infinite amount of time compared md5 brute force.

Publish ssh public host key fingerprints in DNS (SSHFP)

This article describes a solution to the problem where people answers ‘yes’ on the question if they are sure they want to continue connection to a new/unknown SSH server. The solution is to publish SSHFP records in DNS.

Have you ever blindly answered yes to something like this?

The authenticity of host 'framkant.org (52.16.239.146)' can't be established.
ECDSA key fingerprint is 42:f9:b3:40:17:61:89:e4:80:cf:d5:ae:bb:bb:7d:75.
+--[ECDSA  256]---+
|   ....o+o       |
|  .  oooo.       |
|   o .=..        |
|    oo o.        |
|      o.S        |
|      .o o  . E  |
|       ..  . .   |
|      ..  .      |
|      ++..       |
+-----------------+
Are you sure you want to continue connecting (yes/no)? 

Well, dont. Of course its very important to know WHERE you are connecting. In a directed attack the attacker could have set up a server of their own to fool you to reveal important passwords or other information. But most people dont think to much about this and just answers yes to get rid of the message.

The problem is, HOW do you distribute the correct fingerprint and check it? In a datacenter there are many was to do this (configuration orchestration, ldap and so on) but to end users and home computers this is a probem. Of coruse you could post your fingerprints on a webpage secured with https, but the chances a user would really sit down and compare the numbers are slim.

The solution is DNSSEC. When your zone is signed and the chain of trust is complete a client can really trust the correctness of the information present in the DNS tree. Publishing your ssh host key fingerprints here sounds like a great idea. The new record type SSHFP solves this problem and the good news is that OpenSSH have support since a few years back. Its even so simple that ssh-keygen can generate the new records for you:

> ssh-keygen -r framkant.org
framkant.org IN SSHFP 1 1 d6a64454a9a559ec35f59994c2e5f8376ff86ac8
framkant.org IN SSHFP 1 2 99d78eff62823561bab2661a72250f1e8344c1c6a4e8903f0d5d8ebce6d819b7
framkant.org IN SSHFP 2 1 9572024308e542074768bbfd6a3ff8b30e940ce2
framkant.org IN SSHFP 2 2 ab63e4ebe5ba0b9eb12a9735a533cfdf5e2807bac852e8b019dedfb630841896
framkant.org IN SSHFP 3 1 fe1160646ac00872d269ebd7ddaa07cb83d7d6af
framkant.org IN SSHFP 3 2 6580debbe37b4a2f32eed78aec2e2f943de6559f24f2b6d7671e78a0ca469728

The first digit represent the key type and the second represent the hash used. You can read more about this in RFC 4255. If your zone is signed by DNSSEC and the chain of trust is complete you will see something like this when connecting to a server with SSHFP records attached to it.

debug1: Server host key: ECDSA 42:f9:b3:40:17:61:89:e4:80:cf:d5:ae:bb:bb:7d:75
debug1: found 6 secure fingerprints in DNS
debug1: matching host key fingerprint found in DNS
debug1: ssh_ecdsa_verify: signature correct

OpenSSH uses two different methods to find out if the records are secured by DNSSEC. If compiled with ldns-support it will perform the DNSSEC-validation itself. If not, it will trust the resolvers in resolv.conf to do the validation. The resolver will set a special bit, the AD-bit (Authenticated Data) if dnssec validates. If the AD-bit is set on the response from the resolver ssh will assume that the records can be trusted.

If you want ssh to always try to use information found in DNS add this to your ~/.ssh/config

Host *
    VerifyHostKeyDNS yes

References
RFC 4255

WPA2 Enterprise with hostapd

After setting up my wireless FreeBSD router I wanted to secure my wireless network with WPA2 Enterprise.

I’ve had a really hard time finding any good documentation on hostapd, but I finally got it to work. So why would you use WPA2 Enterprise, isnt Personal good enough? Well, the problem is these days that anyone can set up a wireless network with the same name as yours. If you connect to this fake network beliving you are connected to your own someone have full access to everything you send and receive. WPA2 Enterprise fixes this because the access point also has to prove its identity by providing a valid SSL Certificate. If this certificate changes you will be notified right away.

So, how do you set it up in hostapd? Well, its not that complex at all, the problem is that you cant find any documentation on it.

Configuration

Here is my configuration for WPA2 Enterprise. This uses hostapds own internal RAIDUS-server but you could as well use FreeRADIUS or some other RADIUS server out there, but then you’ll have to figure out how to configure that in hostapd. 😀

/etc/hostapd.conf

interface=wlan0
driver=bsd
ctrl_interface=/var/run/hostapd
ctrl_interface_group=wheel
ssid=web
wpa=2
wpa_key_mgmt=WPA-EAP
wpa_pairwise=TKIP CCMP
macaddr_acl=0 
auth_algs=1
own_ip_addr=127.0.0.1
ieee8021x=1
eap_server=1
eapol_version=1

# Path for EAP server user database
eap_user_file=/etc/hostapd_eap_user
ca_cert=/etc/ssl/startssl.ca.pem
server_cert=/etc/ssl/domain.tld.crt
private_key=/etc/ssl/domain.tld.key

/etc/hostapd_eap_user

"peter@domain.tld" PEAP [ver=0]
"peter@domain.tld" MSCHAPV2 "passphrase" [2]

You can also set up it to require client certificate to connect to make it even more “secure”. It all depends on how you handle your certificates and passwords.

#"peter@domain.tld" PEAP [ver=0]
"peter@domain.tld" TLS

I use free host and client certificates from https://www.startssl.com but if you want to set up your own CA you can find and excellent article here
Update:
I have found some “documentation” in the form of well commented configurationfiles.
https://w1.fi/cgit/hostap/plain/hostapd/hostapd.conf
https://w1.fi/cgit/hostap/plain/hostapd/hostapd.eap_user
https://w1.fi/cgit/hostap/plain/hostapd/

Secure wireless FreeBSD router

One of my hobby projects is to build a “fully fledged” wireless  FreeBSD router. To do this I got a Soekris 6501-50 which has four gigabit ports and two mini PCIe slots.

For storage I have a small 30GB miniPCIe SSD (OCZ-NOCTI). I have two wireless cards installed one dual band 3x3MIMO minipcie card from COMPEX (When FreeBSD gets up to speed with 802.11ac I will upgrade to a WLE900VX) and for legacy 2.4Ghz I use a TPLINK TL-WN781ND. These two cards are then used for two virtual interfaces each, one for my primary wlan and one for my guest wlan.

Atennas

One important part of the wireless part of the router is the antennas. For a long time I used three consumer antennas (ALLNET ALL19003) for 5GHz use for my COMPEX card, but when I moved to a new apartment and switched to 5GHz I didnt get good speeds everywhere in the apartment. This got me thinking about a ceiling antenna. But I found it very hard to find one in consmer stores, so I turned to Ebay. I found a decently cheap Laird S2451DBT 6port antenna which is now mounted in the ceiling at a central point of the apartment.

Firewall

To do packet filtering I use the OpenBSD derived pf(4) which has been in FreeBSD for a long time now.

Wireless networks

Like I told you in earlier I have two physical cards and two networks (ssid). One primary and one guest networks with tighter rules but less strict authentication.

The firt step here is to find a card supported by FreeBSD, but also have support for hostap mode, obviously mine does. To get it to run WPA2 Personal on a specific channel the configuration is very easy

interface=wlan2
ctrl_interface=/var/run/hostapd
ctrl_interface_group=wheel
ssid=web2
wpa=2
wpa_passphrase=
wpa_key_mgmt=WPA-PSK
wpa_pairwise=CCMP

Lately I started to use the more secure WPA2 Enterprise and you can read about my configuration here

Other networks

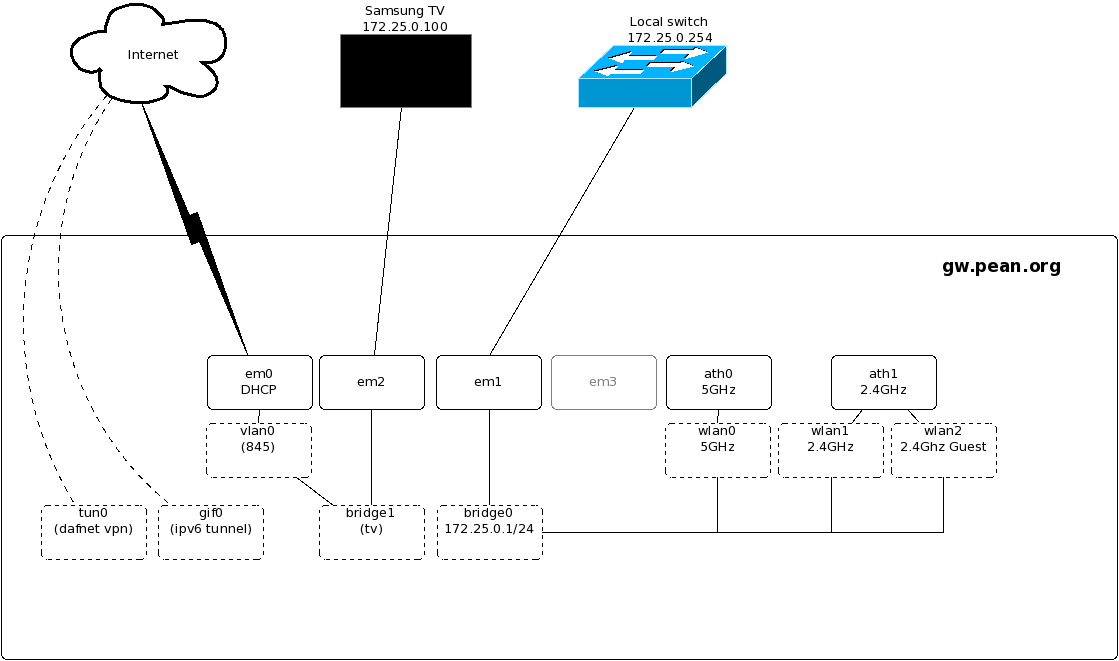
My internet provider is Telia and I have something they call Triple Play.. (Internet, TV and Tele in the same cable). In order to get this to work you should use their Thompson router that has som magic for splitting up your one incoming fiber into three different networks. After some reading on the interwebs I found out this is really just tagged vlans and I can split them myself without any problem. “Internet” comes untagged and the IPTV traffic comes in on tag 845, so I just create a vlan interface with my external interface as parent and then bridge this interface to one of my internal interfaces on the Soekris. (and of coruse connect the IPTV-box to this port). You can read more about this configuration here (swedish)

home_network
home_network

This is how the interfaces are configured

home_network

OpenSSH with ECDSA keys on yubikey/smart card

In one of the latest versions of OpenSSH it is now possible to store ECDSA keys on smart cards. If you managed to use ssh with your RSA keys on the yubikey its fairly simple to go to ECDSA. The only thing you need is a late snapshot of OpenSSH portable and a patch.

# fetch http://www.mindrot.org/openssh_snap/openssh-SNAP-20151124.tar.gz
# tar zxf openssh-SNAP-20151124.tar.gz
# cd openssh 
# fetch "https://bugzilla.mindrot.org/attachment.cgi?id=2728" -o ecdsa.patch
# patch -s < ecdsa.patch
# ./configure
[...]
# gmake
[...]

Now you should be able to use get public keys from the smart card on your yubikey. Make sure pcscd is running then fetch the key with your newly compiled ssh-keygen.

# ./ssh-keygen -D /usr/local/lib/opensc-pkcs11.so
C_GetAttributeValue failed: 18
ecdsa-sha2-nistp256 AAAAE2VjZHNhLXNoYTItbmlzdHAyNTYAAAAIbmlzdHAyNTYAAABBBAJGTLvC9BHSNPAfOw3s4lEix3zKLBKRgZlQ9kSxyttSG8XZ/NIoxm+ZYGbkYxji1kN7brMff21mgXGUzfxp58M=

References:
https://bugzilla.mindrot.org/show_bug.cgi?id=2474
http://lists.mindrot.org/pipermail/openssh-bugs/2015-September/015514.html
https://framkant.org/2015/11/using-smart-card-enabled-yubikey-for-ssh-authentication-in-freebsd/

Running OpenDNSSEC

During the years there have been several vulnerabilities found in the DNS protocol making it possible to fool clients in different ways. Maybe the most well known is called dns cache poisoning. To resolve some of these problems people came up with DNSSEC. DNSSEC is a way to cryptographically prove the authenticity of a DNS response by validating signatures all the way up to the root zone. You can read more about it on wikipedia.

This article is an attempt to describe how to implement DNSSEC on your own authoritative name servers. The first and most important step before you even begin to think about implementing DNSSEC is to find out if your registrar supports publishing DS records in the parent zone. If this is not the case your chain of trust will be broken and dnssec will fail.

Installing
OpenDNSSEC uses a PKCS#11 enabled backend to store cryptographic material (Hardware Security Module). These could be very expensive, so they also provide a software version of a HSM. This way you can start using OpenDNSSEC without having to pay thousands of dollars on crypto hardware. I’ve been looking into a quite affordable HSM for my (very small) needs. http://www.smartcard-hsm.com

We start by installing the software from packages

# pkg install opendnssec
[...]
# pkg install softhsm
[...]

Configuration
We start by setting up the SoftHSM. It comes default with this configuration which will work just fine for us.

# SoftHSM configuration file
#
# Format:
# :
#
# The given paths are just an indication to SoftHSM on where it should
# store the information for each token.

0:/var/lib/softhsm/slot0.db

We then need to initialize the HSM by running

# softhsm --init-token --slot 0 --label "OpenDNSSEC"
The SO PIN must have a length between 4 and 255 characters.
Enter SO PIN: 
The user PIN must have a length between 4 and 255 characters.
Enter user PIN: 
The token has been initialized.

You will later use the SO PIN to reset/reinit the HSM and the user PIN will be used to access your keys.

Now we can start looking at OpenDNSSEC. First make sure that /usr/local/etc/opendnssec/conf.xml looks reasonable (it does for most people). Just make sure the repository section matches information you gave to OpenHSM.

Then we have a quick look at the kasp.xml “Key and Signature Policy”. This file specifies at which intervals you want to renew the cryptographic keys in you setup. You have have two types of keys for every domain you handle within OpenDNSSEC. KSK and ZSK. The KSK is the “Key Signing Key”. If you are familiar with Certificate authorities this is sort of the Root CA. Its the signature this of key you pass upwards to the parent in the chain of trust. The ZSK is the “Zone Signing Key” and its used to sign the Records in the zone. In the CA anology this is a Intermidiate CA. The purpose of using two keys is to give the opportunity to store the KSK more securely (even offline) when its not used. If you store your keys very securley you can extend the lifetime of the KSK without any problems. The lifetime of your KSK defines how often you need to talk to your registrar and publish new fingerprints in the parent zone. OpenDNSSEC will manage ZSK key rollover for you.

Now we can start opendnssec and begin to have some zones signed. First of all we need to create the databases needed

# ods-ksmutil setup
*WARNING* This will erase all data in the database; are you sure? [y/N] y

Then we can start the opendnssec daemons.

# sh /usr/local/etc/rc.d/opendnssec onestart
Starting enforcer...
OpenDNSSEC ods-enforcerd started (version 1.4.8.2), pid 42305
Starting signer engine...
OpenDNSSEC signer engine version 1.4.8.2
Engine running.

To have it start at boot put opendnssec_start=”YES” in /etc/rc.conf.

Key management
I run OpenDNSSEC and my DNS-server (nsd) on the same machine so I sign the zones and put them in a folder that nsd can reach. It is also possible to send your zones with zone transfers if you are having a separate machine for OpenDNSSEC. Anyway, this is how you add a new zone to OpenDNSSEC and then tell it to sign it.

# ods-ksmutil zone add --zone framkant.org --input /usr/local/etc/nsd/chroot/zones/framkant.org --output /usr/local/etc/nsd/chroot/zones/signed/framkant.org
zonelist filename set to /usr/local/etc/opendnssec/zonelist.xml.
Imported zone: framkant.org
# ods-ksmutil update zonelist
zonelist filename set to /usr/local/etc/opendnssec/zonelist.xml.
kasp filename set to /usr/local/etc/opendnssec/kasp.xml.
Zone framkant.org found; policy set to default
Notifying enforcer of new database...
# ods-signer sign framkant.org
Zone framkant.org scheduled for immediate re-sign.

An here is the before and after:
Unsigned:

$TTL 300
@ SOA ns3.jails.se. peter.jails.se. (
				2015032501
				3H	; Refresh after three hours
				1H	; Retry after one hour
				1W	; Expire after one week
				1D )	; Minimum one day TTL

		NS	ns3.jails.se.
		NS	mx3.jails.se.
		MX	10 mail.jails.se.
		MX	20 mx3.jails.se.
		
@		A	52.16.239.146
		AAAA	2001:470:6c08::1


www		A	52.16.239.146
		AAAA	2001:470:6c08::1

Signed:

framkant.org.	3600	IN	SOA	ns3.jails.se. peter.jails.se. 2015032504 10800 3600 604800 3600
framkant.org.	3600	IN	RRSIG	SOA 8 2 3600 20151214230507 20151130173240 26386 framkant.org. iheuqDSSeLdoXJpYOI9ICFSDETnxXbls5K8YnnLBqeQOqgvxNRESWqy1rgAtnReFHnijcMpwly3ttFGUVtd9C4x3dQwMSbgwe9mXY0Tp/ojDdXG0UQLUXHgys0jFen1Go+c3r97lRH8RblIDVu5D5tVynO8+fN9FKzy29ZWfcbc=
framkant.org.	3600	IN	DNSKEY	257 3 8 AwEAAdbN+hOWIvhXB/M4R6KUPPALZA+DUcsW/jEl/Q/1BNi2ff9JZECgNi+2sv1nTdZ+6nOchKNP8UoZ41X4d82MQsO+mGIZeXW5Cb0Riqk7+B7EQWd6jH/pXs9/wNBRQHCNGk1NsyHQNgGxdAq3w99oeIaEbiI+4r/fnwjqKpg3boMyWZlNW30XcJMObXu57hO3S6f09I/+r+7d1bH8FbPBI1VWqiDPgQqjMOkJHrroJ3QWNr8qqSJSsxe2Zb9rTmkx6htrS2XQT2v1kvTT3iBO/Vf+JNbSNYOX4BnR5otgwr9I9OteLDFW4NGn5JNm3Q+kvrLAjByGyOsq0hI3TbvXp20= ;{id = 60509 (ksk), size = 2048b}
framkant.org.	3600	IN	DNSKEY	256 3 8 AwEAAfNwi9djf7sYUVQpqScBOBMqjFD9GqHeI11Y/62SWINheq8+sQ8H/yN2H3eqmW9+ffBVNU8VTCVcdLOwkPGEF5Q1lE7hIbHGLunCAUo5OC8yFhuEtXNFoYo/EuGGbgUmcgYLNKIu8+RxzL5VO9dV7FTUy60tnCsYi/tKDGBP376p ;{id = 26386 (zsk), size = 1024b}
framkant.org.	3600	IN	RRSIG	DNSKEY 8 2 3600 20151214194904 20151130173136 60509 framkant.org. G6+/6njI1NSCvWIeOhyvFo/+v1uSSFRx2Art3bv7Gw2nSJA2aMiu1ZVaIw7uGf75xdWr6lSj6ndb61UmTl+N6ccdbTU80HxwPmBA/fVZpGIAJrQ8psLgx8uDY3AxCfZdEq3YM0JzPewLnKGUaoVFsTzoWNNw2NRYqUuRiBnlebibcci70vaI0QpyRlXfSJ4DWls3H0isk0BWdukcpYEKNx4hl6GsRDCpNRoNs27TXgHnAcv7YV1528gyrgbw63DT6yyyL49nlN+TEV5aiDlNsjnkYJqgy869xfMROAw0VScHderqnixW4LlAGX0QYuPuOoK2dPx874i7xH7JhOoTbQ==
framkant.org.	0	IN	NSEC3PARAM	1 0 5 c2d153cf47fb60fa 
framkant.org.	0	IN	RRSIG	NSEC3PARAM 8 2 0 20151214120059 20151130173136 26386 framkant.org. DlSk0ye1kcP7g0z6QJy0QYpB75ZPpWhbypyRJ3a+L0BaL4cY/cdRS9SACxmhXu/kEkrmadJ/IcfDMhMHOj9D0uY+8ksbKfVhpAX237sFp18V8rsH0zkOPjMjD1O4c30N+isLVdnaPX3OyIRxqRFrRL2XH4kMOR9c8uBpBtin/MU=
framkant.org.	300	IN	NS	ns3.jails.se.
framkant.org.	300	IN	NS	mx3.jails.se.
framkant.org.	300	IN	RRSIG	NS 8 2 300 20151214130253 20151130173136 26386 framkant.org. X9V2dv2+tyWoom6SC5zwkgkMj0buTu/wvGO/ClE7KveJ3YwmG/kPH0z37sS6GWK+j1MzNTzDepcUdxxghO/shDZvSz/7WAtvuHVPWfo2lg+iGG7nxCmYqcmq7Vo2+GZCU5TRjivsCDxen9w+e8+AuZtpuTkEppTQMbEIq+qNGyw=
framkant.org.	300	IN	MX	10 mail.jails.se.
framkant.org.	300	IN	MX	20 mx3.jails.se.
framkant.org.	300	IN	RRSIG	MX 8 2 300 20151215000707 20151130173136 26386 framkant.org. Yw1eRGRESXu1bGh/RNhqJNFpjv+MsDzoyxoPOTNTZiBr+OmlCq6p8M6QgfEPIipmg0VzrHJjzEFfpb4WQmPTKKehH/nEoevKLAogPjbozucr+lgjAXh3AoXr15OYF9dyJilyuTLQ3TyyWDAOxSHtnHy5w704ibaIyGoeKniTf3k=
framkant.org.	300	IN	A	52.16.239.146
framkant.org.	300	IN	RRSIG	A 8 2 300 20151214104407 20151130173136 26386 framkant.org. zmVjO5Rh1R+lpIUdIvsyTCmhGt2qL1wHUIOlZJbBkiiVpdE051MhRTShRjU79LQ5a+SlBeE5jjVeRrAXhTAb6KhNzZ5j5JaTjPYXzqxe//ddpMYEDzGhmuO1zkfUjtKCFhxgk92lFqimHXJFTj3nXdgbmqvK1io7aqYWCRvKxt4=
framkant.org.	300	IN	AAAA	2001:470:6c08::1
framkant.org.	300	IN	RRSIG	AAAA 8 2 300 20151214075539 20151130173136 26386 framkant.org. ymUD9mz9uQ6on0SF8TSFbb5xU100mJZuZeJafub1YkeolsxmcyXP0HQl0c20QFHWWp7qX4L7rY7QKIgc9aeaMkskrT9BEmwFoTB/MMu9nrweZyyAUdnnrD06mJ6BumBM0ZWBt6qHLe4tiPh8YVqCCjhFBo+SUvDOfelg3k/QAkY=
rl1jo83jomo43daiudaavkfofbmtkks2.framkant.org.	3600	IN	NSEC3	1 0 5 c2d153cf47fb60fa  h0gt9jkpqemi2oumlejri2lvo60uc2qt A NS SOA MX AAAA RRSIG DNSKEY NSEC3PARAM 
rl1jo83jomo43daiudaavkfofbmtkks2.framkant.org.	3600	IN	RRSIG	NSEC3 8 3 3600 20151214151238 20151130173240 26386 framkant.org. 6iNFSodcFOSydizrXrduzAsTPkZB+wqqr0IrdqEL+YcoM1aefmHfX3l5Kems01KCihozii5O23oprGXw0niYk4ESvXjYH0pOK/J6KWes9PirDQj0P8w//FiX9I7jYL4YkfAqf+pKU1vx2mVDT5ATD2Dkty4GX7eKg4h7qDvgSUM=
www.framkant.org.	300	IN	A	52.16.239.146
www.framkant.org.	300	IN	RRSIG	A 8 3 300 20151214080233 20151130173136 26386 framkant.org. TqG3vzzO3vIPVLZpWHh5Sh6ijNBr61u+7jEMlpl/kfj7S5wvmMgUkWl+hmNaokgrDvrEahpCdTQ0yjSmWl+m5aVFlV17x0x5lJN+Fcx+SuOqqdkHkYKDyTShWdyfDRj9rAQxThbrhvOz3+6gfTJ1HMeGBXIkLMzf1MEojHDlhEg=
www.framkant.org.	300	IN	AAAA	2001:470:6c08::1
www.framkant.org.	300	IN	RRSIG	AAAA 8 3 300 20151214134021 20151130173136 26386 framkant.org. reaA1ca5Jly76YPU+Nfq6CEwgqx7/T2xYh7IzfJ4aZ034vF7djYJFvNMvKMF5wuX7hbP44B3lQk/mnYlzmuVsKGYIwNvU+4+ggIsahgdCItasFOLdJln3oY7f+ch/o6XljE9JKusWFYT2GcPLCsr73PcEIF3QkdXDgXZzSDuZBc=
h0gt9jkpqemi2oumlejri2lvo60uc2qt.framkant.org.	3600	IN	NSEC3	1 0 5 c2d153cf47fb60fa  rl1jo83jomo43daiudaavkfofbmtkks2 A AAAA RRSIG 
h0gt9jkpqemi2oumlejri2lvo60uc2qt.framkant.org.	3600	IN	RRSIG	NSEC3 8 3 3600 20151215051041 20151130173240 26386 framkant.org. lbAGEJm+kCHy68wZ9YqbAFuESnabPvL5TwA0MnwtliUa+lB5DEI2/DIPa+QS7sekjWUxmve2FQoQC+0gFbCP9gOFle8bTwZsAf7ZtZJeVuzEI/HcisNbJk5bV/E/p6xyIBwUDKbcdPh1vhmyDXkhSOZ0o16vLbPgZwuBKtk8J2s=

To handle your created keys you can use ods-ksmutil

# ods-ksmutil key list --verbose
SQLite database set to: /usr/local/var/opendnssec/kasp.db
Keys:
Zone:                           Keytype:      State:    Date of next transition (to):  Size:   Algorithm:  CKA_ID:                           Repository:                       Keytag:
framkant.org                    KSK           publish   2015-12-01 09:31:35 (ready)    2048    8           adcfe72699de3bb9afe511d67a112580  SoftHSM                           60509
framkant.org                    ZSK           active    2016-02-28 19:31:35 (retire)   1024    8           fcf02532b68b64f7f0dbccf85be3677f  SoftHSM                           26386

Now you need to publish a fingerprint of you key in the parent zone. Please refer to your registrar on how to do this. In sweden at least .SE, binero and loopia have support for this. To get the DS record you can use:

ods-ksmutil key export --ds --zone framkant.org
;active KSK DS record (SHA1):
framkant.org.	3600	IN	DS	65041 8 1 766dee3e0d5cac1c19529d4474eb828d72a91d24
;active KSK DS record (SHA256):
framkant.org.	3600	IN	DS	65041 8 2 a5aba22e70dcc7ad0ee9d31210f87b4f8e99bf6222463eb9c53f3d7a46143129

This is the information you need to send to your registrar. When you can see the DS-record in the parent zone

# drill DS framkant.org @b2.org.afilias-nst.org
;; ->>HEADER<

it is time to tell OpenDNSSEC that the keys are in place and its time to mark the KSK as active.

# ods-ksmutil key ds-seen --zone framkant.org --keytag 60509

Now you are up and running, and if all goes well it will work just fine for one year, until you will need to change the DS records present at the tld. Please refer to the OpenDNSSEC documentation for more information.

Reference:
https://wiki.opendnssec.org/display/DOCS/OpenDNSSEC+Documentation+Home
https://wiki.opendnssec.org/display/SoftHSMDOCS/SoftHSM+Documentation+v1.3

Using Smart Card enabled yubikey for ssh authentication

This guide will try to show you how to use yubikey for ssh authentication

I recently found out that the yubikey neo had a built in smart card. Also, a few days ago Yubico released their fourth version of the yubikey introducing built in smart card as a standard feature. Me, having very little knowledge and experience with smart cards bought one just to play around with and I quickly found out that the card could be used to securely store encryption keys and certificates.

I use SSH alot both at home and at work, so this was the natural place to start. There is a short guide on how to use the yubikey with ssh on the yubikey developer site but this only covers the yubikey-part. This article will show you how to get things working in FreeBSD. But it will also skip the steps needed to configure the yubikey to have the smart card enabled, and how to generate keys and so on (yubikey software needed)

First if all you need to install a few packages.

# pkg install pcsc-lite
# pkg install opensc
# pkg install libccid

Then there is alot of stuff you can fiddle with using the pkcs11-tool, pkcs15-tool commands. But to get going you can just start the pcscd daemon manually and insert the yubikey into your computer.

# pcscd -f -d

If you have correctly generated a key (and certificate) on the yubikey in one of the slots you should now be able to run

$ ssh-keygen -D /usr/local/lib/opensc-pkcs11.so
C_GetAttributeValue failed: 18
ssh-rsa AAAAB3NzaC1yc2EAAAADAQABAAABAQCOvhEqFq9Ualp1iYiNs0JFs3MgvGU+By/VvyW4qkymW+w/MmHAaHl+/UFnE+kgXChdYHaGEVxxGi6dQlSq+1ZKAWPJsOEbkysK6cgjgvP21gVNjL62TlQz+QfGF82mv0hfSGXQrZQR7VDs+6xJOe3S/0i1HvnnRTdR2v9QSJzd2EWNLmUcPy7+4x4rEB11G0oPt+Xyx60WaleJctwJHHhJS/jqHdvuf7HO6MS/EQn2NTnwIjChlmm2kUT7obnev/r6uEwz87NubnYJUrYImRDMafjS9taq8l7y33ydT00QHEI76kmrSSi7hTfmxUgStQWuQ2mq10YEVd8kZ2sqmC3N

To show the public part of your keys residing on the smart card. If this command was successful you can also add the keys to your ssh-agent using

$ ssh-add -s /usr/local/lib/opensc-pkcs11.so
Enter passphrase for PKCS#11: 
Card added: /usr/local/lib/opensc-pkcs11.so

and then you can list the keys with

$ssh-add -l
2048 8c:c9:99:1f:1b:98:42:af:9b:9b:93:e6:5b:ff:2a:94 /usr/local/lib/opensc-pkcs11.so (RSA)

To remove the card from the agent use

$ ssh-add -e /usr/local/lib/opensc-pkcs11.so
Card removed: /usr/local/lib/opensc-pkcs11.so

To connect somewhere using the keys on the smart card without the agent you can just use

$ ssh -I /usr/local/lib/opensc-pkcs11.so user@host.tld

There will probably be more guides in the future on how to use this further.

Update:

You can now use ECDSA keys stored on yubikey with OpenSSH.